A keyless chuck makes swapping drill bits fast and simple because you do not need any special tools or keys to tighten it. If you have just bought your first cordless combi drill, understanding how to operate the chuck is the absolute first step to tackling any DIY project around the house.
Here is everything a beginner needs to know to open, close, and safely operate a keyless chuck.
To use a keyless chuck, rotate the outer sleeve by hand to open or close the jaws around your drill bit.
Most modern combi drills (like DeWalt, Makita, Ryobi, and Bosch) have a keyless chuck. This means you don’t need a chuck key to tighten it. However, if you don’t know the proper technique for locking bits into a keyless chuck, they will slip or wobble under pressure.
My guide explains how a keyless chuck works and how to lock your drill and screwdriver bits securely every single time.
Before You Start: Drill Anatomy & Safety
Before adjusting your chuck, locate these three essential controls on your combi drill:
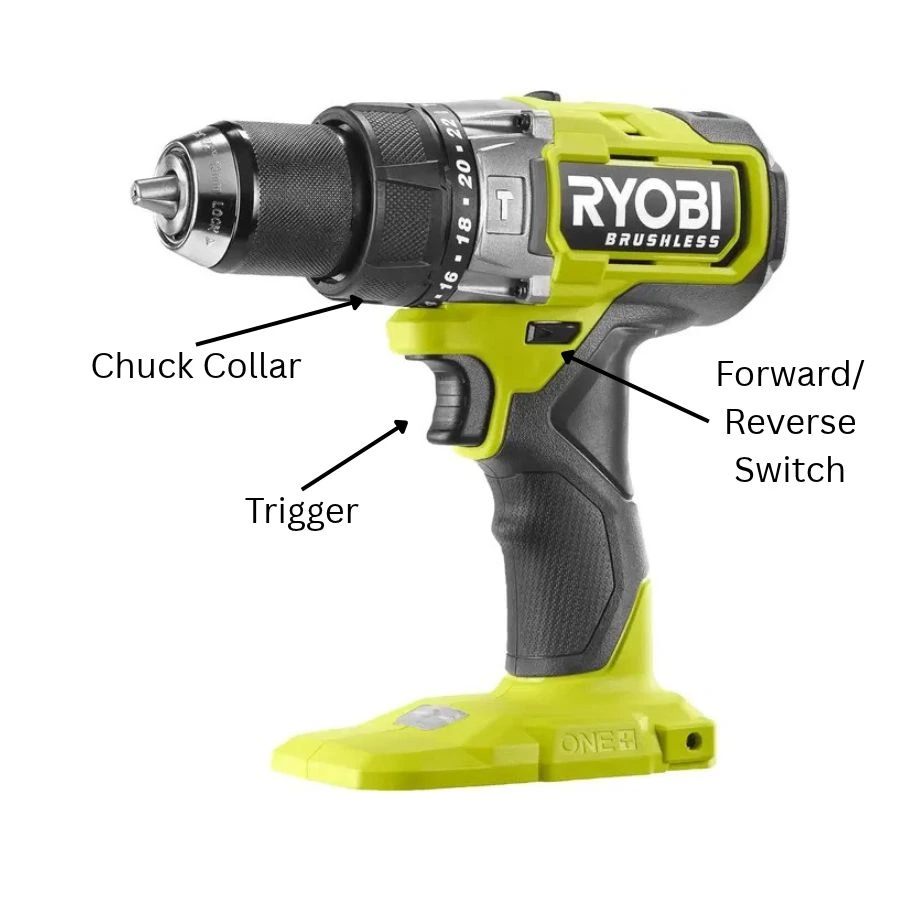
- The Chuck Collar: The rotating front sleeve of the drill.
- The Forward/Reverse Switch: The slider button just above the trigger.
- Forward (Clockwise): Tightens the chuck / Drills into walls.
- Reverse (Counter-clockwise): Opens the chuck / Backs screws out.
- The Trigger: Controls the rotation.
⚠️ Safety First: My advice is to always put the forward/reverse switch into the neutral (middle) position before inserting or removing bits. This locks the trigger completely so the drill cannot accidentally spin while your fingers are near the chuck.
Step 1: How to Open the Chuck (Removing a Bit)
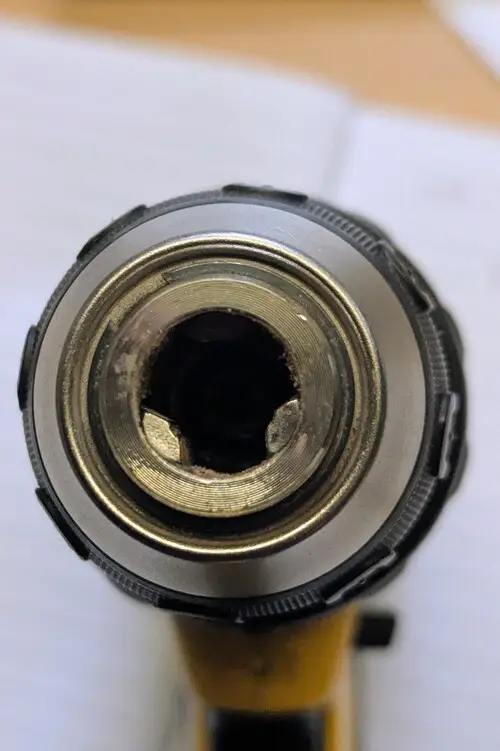
If there is already a bit in your drill, or if the internal jaws are completely closed, you need to open them up.
- Lock the trigger: Set the directional switch to the middle (neutral) position.
- Grip the collar: Hold the drill handle firmly with one hand, and grasp the chuck collar with your other hand.
- Rotate counter-clockwise: Turn the chuck collar to the left (counter-clockwise if you are looking directly down the front of the drill).
- Watch the jaws: You will see the three metal teeth (jaws) inside the chuck retract outwards, widening the opening. Keep turning until the opening is wide enough for your bit to slide out.
Step 2: How to Insert and Tighten a Bit
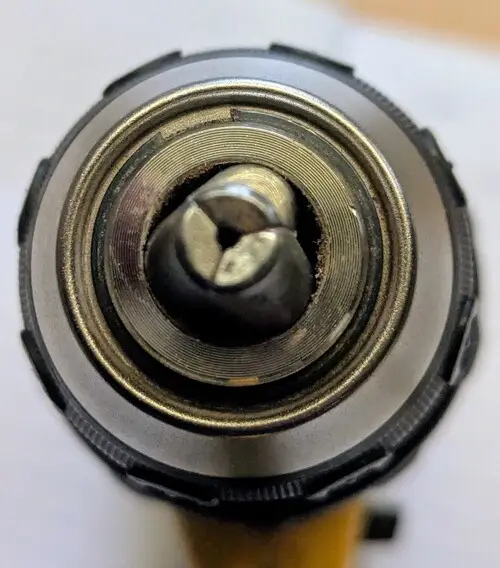
Securing a bit properly ensures your drill runs straight and prevents the bit from slipping while you work.
- Insert the bit straight: Slip the shaft of the drill bit directly into the centre of the three jaws.
- Beginner Tip: Ensure the bit is perfectly centered. If it slips between two of the jaws rather than right in the middle, it will wobble violently when you pull the trigger.
- Hand-tighten clockwise: Hold the bit straight with one hand, and twist the chuck collar to the right (clockwise) with your other hand. Keep twisting until the three jaws clamp firmly around the bit.
- The “Click” Lock (Standard on most Combi Drills): Once the chuck feels tight, give it one final, firm twist clockwise. You will often hear or feel a distinct, ratcheting click. This is the internal lock engaging to prevent the bit from loosening during heavy drilling.
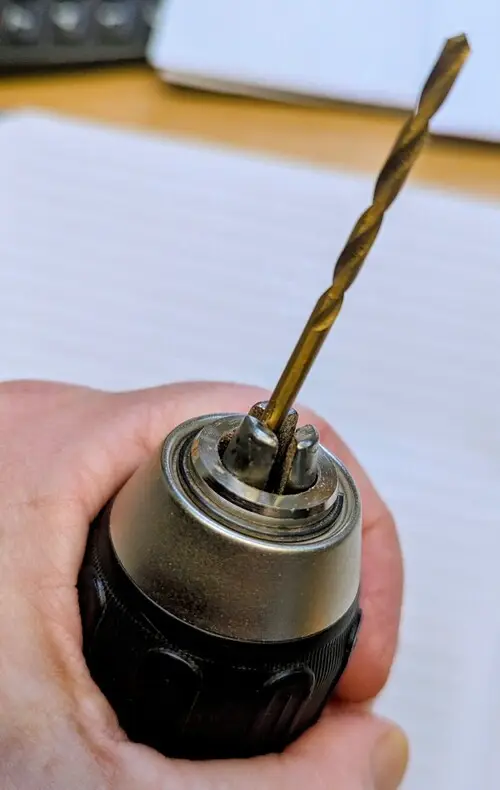
Note: In the image above I deliberately inserted a drill bit the wrong way. Instead of being centred in the chuck, it is only caught between two jaws. If I tried to use this the drill bit would wobble and potentially break. This can happen rather easily with smaller drill bits, so always check before using.
Alternative Method: Using the Drill’s Motor (The Quick Way)
Once you grow more confident, you can use the drill’s own power to open and close the chuck quickly.
- To Open: Hold the chuck collar firmly with one hand, set the drill to Reverse, and gently squeeze the trigger. The motor will spin the internal mechanism open instantly.
- To Close: Insert your bit, hold the collar, set the drill to Forward, and gently squeeze the trigger. The drill will spin itself tight against your hand grip. Always do the final manual twist at the end to ensure it is locked.
Can’t get the chuck to tighten?
Take a look at your drill’s chuck. If it is a single-sleeve (one solid piece), you can tighten it easily with one hand. If it is a double-sleeve (split into two rotating rings), you need to hold the back ring firmly with one hand while twisting the front ring with the other to lock it in place!
Real-World Lesson: The Spinning Bit Trap
When I was first learning DIY, I used to lazily tighten my masonry bit by just spinning the chuck ring until it felt snug by hand.
During a project drilling into a tough engineering brick lintel, I applied heavy forward pressure. Suddenly, the drill started screaming loudly, but the bit stopped moving entirely. When I pulled the drill back, the friction had completely chewed up and rounded the smooth round shank of my masonry bit, welding it temporarily inside the hot chuck jaws. I had to use two pairs of pliers to wrench the ruined bit free.
The lesson? Take an extra 3 seconds to ensure your chuck is locked down tight. A loose bit destroys bits and damages your chuck.
Next Steps & Related Guides
This article is part of our [Ultimate Beginner’s Guide to Combi Drills]. Explore more of our hands-on guides below:
- [Combi Drill Settings Demystified: Torque, Gears, and Modes]
- [Screwdriver Bits Explained: PZ vs PH vs Torx]
- [How to Drill into UK Brick and Mortar Walls Safely]