By Enda McLarnon — Experienced UK DIYer sharing practical fixes from my 1958 red brick home.
Part of our Complete UK DIYer’s Guide to SDS Drills
One of the biggest hidden perks of owning an SDS Plus rotary hammer isn’t drilling holes at all, it is chisel mode.
If you have ever spent a weekend stripping stubborn ceramic bathroom tiles with a club hammer and a cold bolster chisel, you know how exhausting and slow this manual demolition can be.
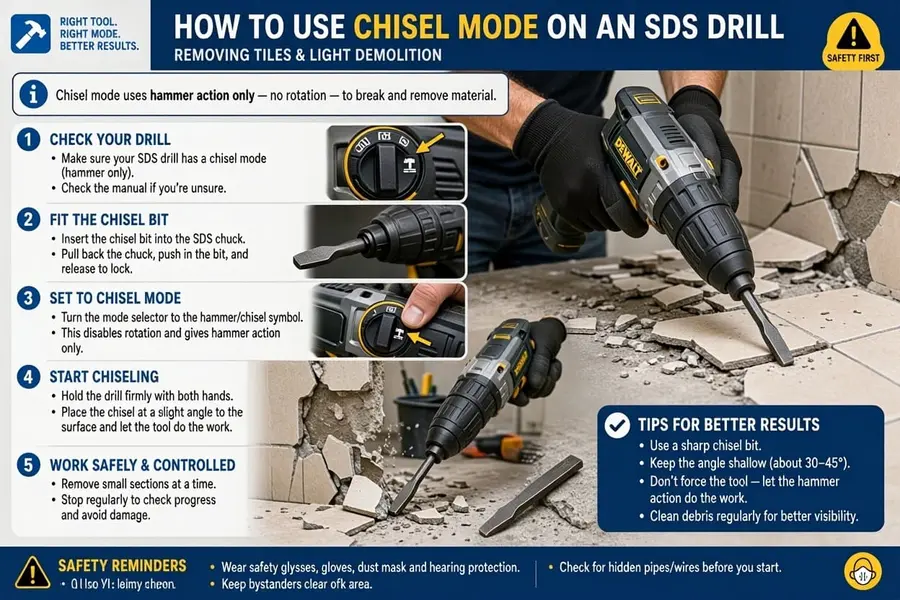
Switching a 3-mode SDS drill to rotation-stop turns it into a compact pneumatic hammer that lifts wall tiles, strips old tile adhesive, and chases cable channels into plaster in a fraction of the time.
Here is how to set up chisel mode safely, which chisel bit to use for different UK DIY jobs, and how to avoid damaging the wall underneath.
1. First Check: Do You Have a 2-Mode or 3-Mode SDS Drill?
Before buying chisel bits, look closely at the selector dial on the side of your SDS drill’s gearbox:
- 2-Mode SDS Drills: Only feature Rotary (drill icon) and Rotary Hammer (drill + hammer icon). Because the chuck never stops spinning, you cannot safely use chisel bits on a 2-mode drill—the bit will spin wildly and catch on the wall. (Models include Milwaukee M12CH-0 M12 and Makita HR1840/2 18mm SDS+)
- 3-Mode SDS Drills: Feature a third Hammer-Only / Rotation-Stop setting (a single hammer icon on its own). This disengages the rotational drive so the piston hammers straight forward while holding the chisel blade steady.
(Many modern 3-mode drills also include a Vario-Lock or neutral indexing position between settings—marked by a small dot or rotated chisel icon—allowing you to twist the flat chisel blade to the exact ergonomic angle you want before locking it into place).
2. Picking the Right SDS Plus Chisel Bit
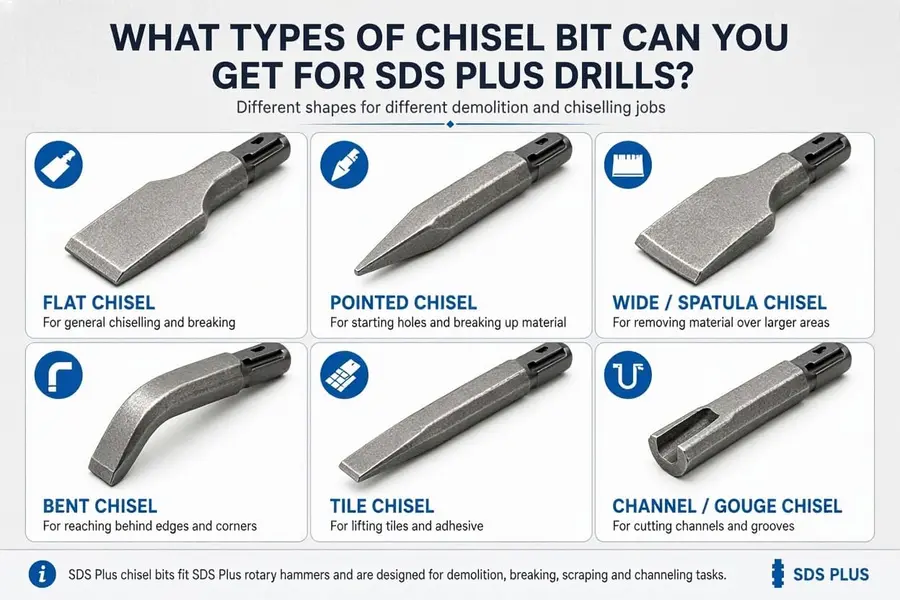
Using the wrong chisel profile makes light demolition much harder than it needs to be. Keep these three basic SDS Plus bits in your kit:
- Cranked Tile Chisel (40mm–75mm Wide): Features a wide, flat blade bent at a slight angle (roughly 15–20 degrees). The angled neck lets you hold the drill comfortably while sliding the blade flat behind wall or floor tiles without digging into the plasterboard or brick behind.
- Flat Cold Chisel (20mm Wide): Ideal for chipping off stubborn blobs of dried mortar, levelling high spots on concrete floors, or tidying up brickwork openings.
- Pointed Chisel (Bull Point): Concentrates all the impact energy onto a single tip. Best for breaking up thick concrete paving slabs, old hearth bases, or dense mortar beds.
3. Step-by-Step: How to Remove Wall Tiles With an SDS Drill
Stripping kitchen or bathroom tiles is where chisel mode shines, provided you let the tool do the work rather than forcing it:
- Grease and Lock the Chisel: Wipe a small dab of SDS grease onto the slotted shank, push it into the chuck until it clicks, and give it a firm tug to verify it is locked.
- Select Hammer-Only Mode: Turn the gearbox dial to the single hammer icon (and use the angle-lock position to orient the wide blade parallel to the wall).
- Start at an Exposed Edge: Never start in the middle of a tiled wall. Begin at an outside corner, doorway edge, or a tile you have already knocked loose with a hand hammer.
- Keep a Shallow 20°–30° Angle: Slide the cranked blade into the adhesive bed directly behind the tile at a shallow angle. If you angle the drill too steeply into the wall, the chisel will bite straight into soft breeze block or tear chunks out of plasterboard.
- Feather the Trigger: Use steady, controlled trigger speed, as you rarely need full throttle to pop ceramic tiles off mortar or adhesive.
4. Essential Safety & Wall-Protection Rules
- Watch Out for Plasterboard (Stud Walls): An SDS drill hits with serious impact energy (typically 2.0 to 3.2 Joules). While solid brick and block walls handle tile chiselling easily, be extremely gentle on plasterboard walls, as an aggressive chisel will punch straight through the paper and gypsum board in seconds.
- Check for Hidden Cables and Pipes: Before chasing channels into plaster for new sockets or spur switches, always scan the wall with a reliable cable/pipe detector and stay strictly within permitted UK electrical safe zones.
- Wear Full PPE: Flying ceramic tile shards are razor-sharp. Always wear wrap-around safety glasses, ear defenders, heavy work gloves, and a P2/P3 dust mask.
Ready to Master Your SDS Drill?
Chisel mode turns a standard rotary hammer into one of the most versatile renovation tools in a UK garage. To explore more tips on bit maintenance, chuck sizing, and deciding when to leave your combi drill in the bag, head back to our main pillar guide:
👉 The UK DIYer’s Guide to SDS Drills: When a Combi Drill Isn’t Enough

About the Author: Enda McLarnon
I’m an experienced UK DIYer tackling renovation life inside a 1958 red brick home.
I built this blog to help beginners conquer home maintenance anxiety and save a fortune on expensive trade calls.