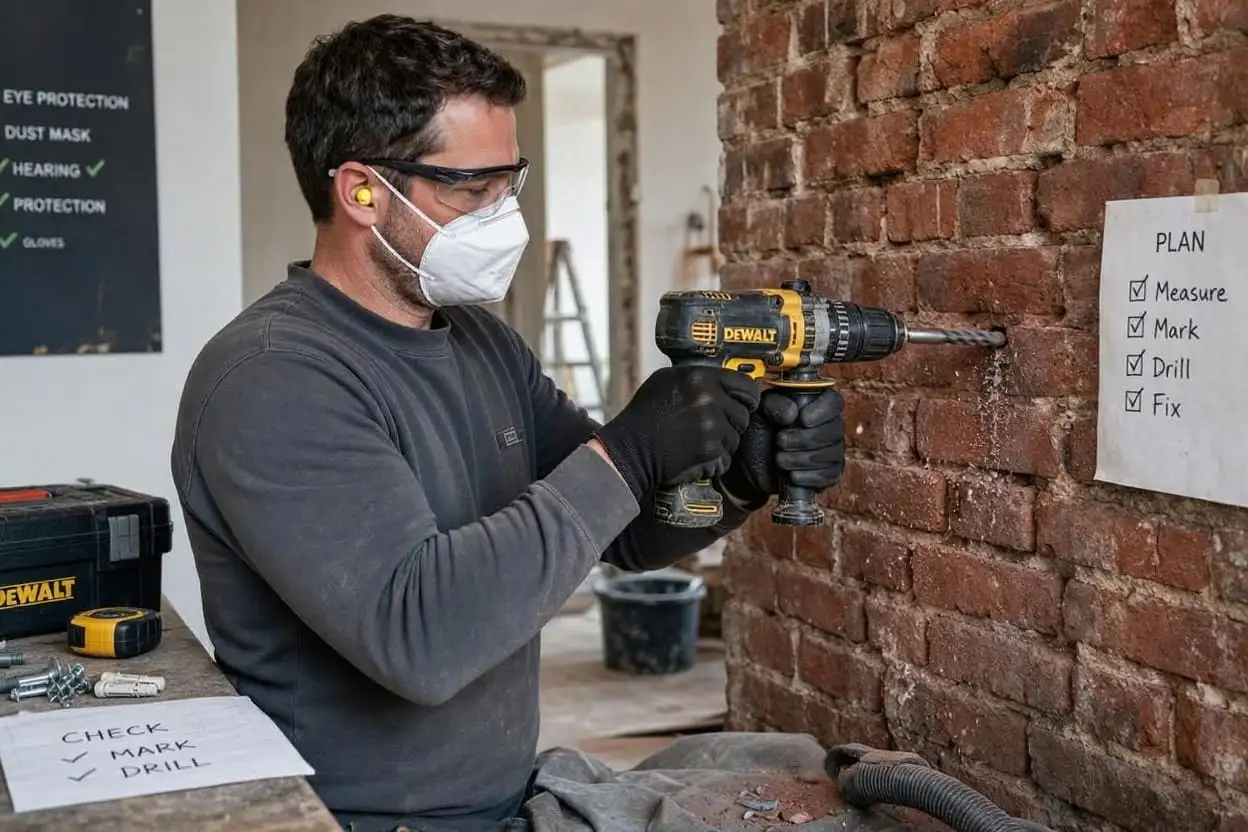
For a UK DIY beginner, drilling into a solid brick wall for the first time can feel a little bit concerning. Unlike soft timber or plasterboard, brickwork is unforgiving. Pick the wrong bit, press too hard, or hit a hidden cable or water pipe, and a simple 10-minute job can turn into a costly repair.
Quick Answer
If you are wondering how to drill into a brick wall, the short version is:
- Use a combi drill in hammer mode (the hammer icon on the settings collar) with a carbide-tipped masonry drill bit
- Match the drill bit size to your wall plug (a 6mm red plug needs a 5mm bit)
- Drill into the brick itself, not the mortar joint, wherever possible
- Check for hidden cables and pipes first with a cable detector, and know the cable safe zones
- Drill 5–10mm deeper than the length of your wall plug, clean the dust out of the hole, then tap the plug in flush
- If you have never done it before, read the safety section below before you start
However, once you understand how brick walls are constructed and how to set up your combi drill correctly, drilling into masonry becomes quick, clean, and completely straightforward. This step-by-step guide covers everything you need to know to safely drill into internal and external UK brickwork.
My first attempt at hanging a TV bracket on a brick wall I ruined two drill bits I had bought at Lidl. That’s because I was using a cheap household drill with no hammer mode and the wrong bits. Once I had a proper combi drill and masonry bits, the same job took ten minutes. The tools matter, but the technique matters just as much.
Table of Contents
1. Safety First: What’s Hiding in the Wall?
Before the drill goes anywhere near the wall, do these checks. They take five minutes and they are the difference between a routine job and a genuine emergency.
Step A: Use a Multi-Detector to Check for Cables or Pipes
In British homes, both period Victorian terraces and modern builds, electrical cables and water pipes often run hidden behind plaster.
- Always run a multi-detector / cable finder over the target area before drilling.
- Remember detectors are not perfect, so scan slowly, several times, and take extra care near kitchens and bathrooms where both cables and pipes are common
- General Rule: Avoid drilling directly above, below, or horizontally aligned with light switches, plug sockets, or wall-mounted boilers.
UK electrical cables are supposed to run in safe zones. If done properly they run straight up and down from sockets, switches and fused spurs, and horizontally at the height of those fittings (Electrical Safety First DIY advice).
That is where they are supposed to run, but DIY wiring, extensions and older homes do not always follow the rules.
Real World Lesson: Older UK Walls
The general advice is to use a multi-detector to be safe. My own experience has taught me these are often quite useless. They work well in stud walls. Many UK homes, like my own house built in 1958, is red brick and breeze block which has been plastered with a cavity in between. Electricians usually track these walls, and run cables.
Using a detector on those is useless. I have had to rely on those electricians using safe zones, and so far they have. I basically avoid drilling anywhere near sockets or light switches, or where I know there will be cable runs.
Step B: Wear Eye Protection & Dust Mask
Drilling masonry produces fine dust containing silica, which you should avoid breathing in. For a few wall-plug holes it is a minor amount, but still:
- Wear eye protection such as safety glasses or goggles (masonry dust in the eye is a common DIY injury)
- A simple dust mask is sensible for anything more than a couple of holes
- Vacuum the dust as you go rather than letting it spread. A folded envelope held under the hole catches most of it. I use a piece of tape to hold the envelope to the wall.
Step C: Basic checks
- Make sure your drill bit is a masonry bit (carbide-tipped, with a distinctive wide, angled tip). Wood and metal bits will not work.
- Check the bit is sharp and undamaged before you start
- Keep the drill’s side handle (if it has one) gripped firmly as the hammer mode jolts a little bit
What You Need
For a typical wall plug job on brick, you will need:
- A combi drill with hammer mode (if you are not sure which drill you need, see my beginner’s guide to combi drills)
- Carbide-tipped masonry drill bits in the size matching your wall plugs — Check Price at Amazon UK
- The correct wall plugs and screws for the job — my UK wall plug and drill bit sizing guide has the full colour coded cheat sheet
- A cable and pipe detector
- A pencil and tape measure
- A piece of tape (to mark drilling depth on the bit)
- A hammer (for tapping in plugs)
- A vacuum or dust sheet
For a reminder of what all the settings and symbols on your drill mean, see my guide to combi drill settings explained.
2. Choosing Your Gear & Drill Settings
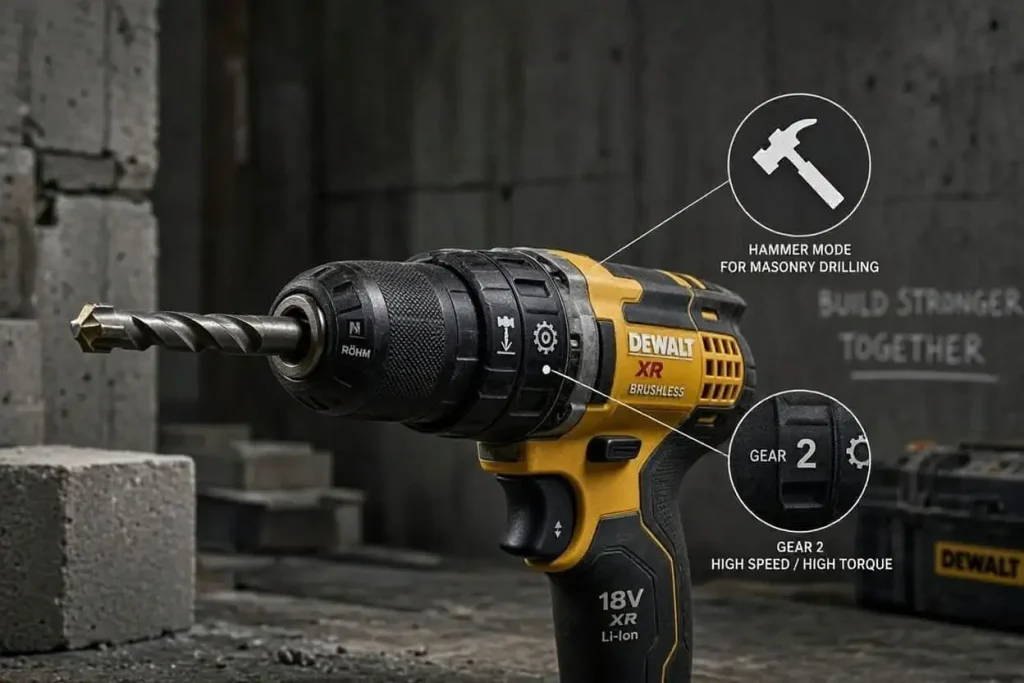
To drill into brick cleanly, you need the right combi drill setup:
- Tool: An 18V Combi Drill (such as a DeWalt, Makita, or Ryobi). Standard drill drivers without a hammer function will not work.
- Drill Bit: A dedicated Masonry Drill Bit (identifiable by the flattened, arrow-shaped carbide tip welded to the point).
- Drill Mode: Twist the collar to the 🔨 Hammer Icon.
- Gear Switch: Set the top switch to Gear 2 (High speed).
- Rotation: Ensure the drill is set to spin Forward (clockwise).
3. Brick vs. Mortar Joint: Where Should You Drill?
When looking at an unplastered external brick wall (or exposed internal brick), you have two choices: drilling into the solid red brick face or the grey mortar joint between the bricks.
- Drilling into the Red Brick: Best for heavy loads. Solid brick provides maximum expansion grip for wall plugs. It is harder to drill, but offers superior strength for items like TV brackets, heavy shelves, or curtain poles.
- Drilling into the Mortar Joint: Best for light loads or temporary fixtures. Mortar is much softer and easier to drill into, making it ideal for hanging light outdoor garden lights or cable clips. However, old UK lime mortar can crumble under heavy expansion loads.
4. Step-by-Step: How to Drill the Hole Cleanly
Step 1: Mark the Depth on Your Drill Bit
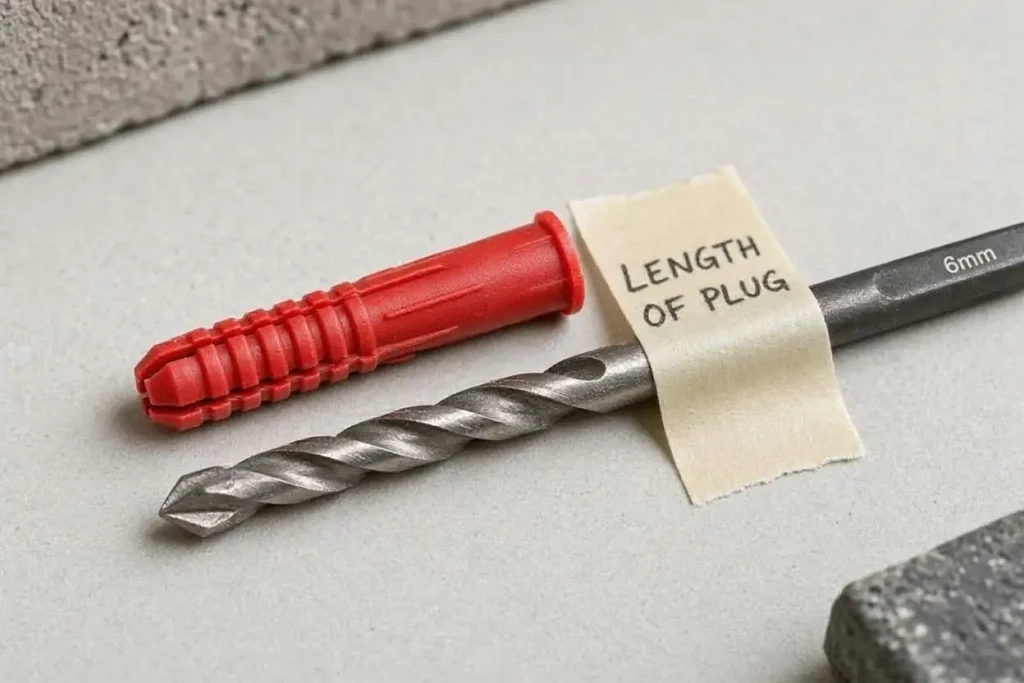
Take the plastic wall plug you plan to use (e.g., a Red 6mm plug). Hold it against your 6mm masonry bit, and wrap a small piece of masking tape around the bit about 5mm deeper than the plug. This gives you a clear visual stop indicator so you don’t drill too deep or too shallow.
Step 2: Establish a Pilot Notch
Masonry bits can sometimes skate or slip across smooth glazed bricks when you start. Place the point of your bit on your pencil mark, hold the drill straight with both hands, and gently squeeze the trigger at low speed for 3 seconds to scratch a shallow notch into the brick face.
My Tip
When I have marked where I am going to drill, I keep an old screwdriver. I use this screwdriver to slowly grind out a small notch. I do this by just twisting the screwdriver clockwise and anti-clockwise, to make a small notch that the tip of the drill bit can fit into. It doesn’t take long and that stops the drill bit from wandering off my mark.
Step 3: Apply Firm, Steady Pressure
Once the tip is seated in the notch, squeeze the trigger fully and apply firm, steady forward pressure against the back of the drill.
- You will hear a loud, rapid rattling sound and this is the internal hammer mechanism pulsing against the chuck.
- Let the tool do the work! Do not lean your entire body weight into the drill. Pushing excessively hard overheats the carbide tip and blunts the bit.
Step 4: Clear the Dust (The In-and-Out Motion)
Every 5 to 10 seconds while drilling, pull the drill bit slightly backwards out of the hole without stopping the motor. This clears the accumulated red brick dust out of the spiral flutes. If dust packs tight inside the hole, it jams the bit and slows down cutting.
Step 5: Stop at the Tape Line
Once your masking tape line reaches the wall surface, release the trigger and pull the spinning bit straight out.
Step 6: Insert the Wall Plug
Blow or vacuum out any remaining dust inside the hole. Insert your plastic wall plug. It should push in with firm thumb pressure or require a light tap with the handle of a screwdriver to sit completely flush with the wall face.
Real-World Lesson: The “Dot & Dab” Trap
In modern UK housing (built from the 1980s onwards), internal walls often look like smooth plasterboard, but hide solid breeze blocks or brick directly behind them. This is known as “Dot and Dab” construction, where plasterboard sheets are stuck over blockwork with dabs of adhesive, leaving a 10mm to 20mm hollow cavity in between.
If you drill into a dot-and-dab wall with a standard 6mm bit and push a red plug in, the plug might slide straight past the plasterboard and fall into the hidden void behind it!
How to Fix It:
If you encounter a dot-and-dab cavity:
- Use a longer masonry bit to drill through the plasterboard AND at least 30mm–40mm into the solid brick behind it.
- Use a longer wall plug or push two plugs in end-to-end so the plug bridges the cavity and expands securely inside the solid brickwork, not the thin plasterboard sheet.
⚠️ A Warning About Included Plugs & Screws (Curtain Rails, Shelves & Kits)
When you buy products like curtain rails, blinds, toilet roll holders, or wall shelves, the manufacturer almost always includes a small bag containing plastic wall plugs and screws.
While it’s tempting to use them, be very careful:
- Unmarked Plug Sizes: Unlike UK brand-name Rawlplugs, bundled plugs are often cheap white or pale grey plastic with no size or millimeter rating printed on them.
- Imported Phillips (PH) Screws: Most UK wood screws use Pozidriv (PZ2) heads, but cheap imported kits frequently include Phillips (PH2) screws instead. If you try to drive a supplied Phillips screw using your standard PZ2 driver bit, the bit will slip, chatter, and strip the screw head instantly.
How to Handle Supplied Fixings:
- Step 1: Test-Fit the Drill Bit: Since the plug won’t say “6mm” on it, hold the smooth shank of a masonry bit against the barrel of the supplied plug. The bit should match the plug’s width exactly. If in doubt, measure across the tip with a ruler—most cheap white plugs are either 5mm or 6mm.
- Step 2: Check the Screw Head: Look closely at the screw head. If it has 4 simple cross-arms, it’s a Phillips (PH) screw; if it has 4 extra tiny diagonal tick marks radiating from the center, it’s a Pozidriv (PZ) screw. Make sure you swap your driver bit to match!
- Step 3: When to Bin Them: If you are mounting anything heavy (like a curtain pole holding lined curtains or a heavy floating shelf) onto brick walls, throw the unbranded supplied white plugs away. Replace them with genuine colour-coded UK wall plugs (e.g., Red 6mm or Brown 7mm Rawlplugs) and quality wood screws. It costs pennies and ensures your curtain rail won’t rip out of the wall six months down the line!
Common Brick Drilling Mistakes to Avoid
- Drilling in Reverse: If the drill is screeching, spinning fast, and making zero progress into the brick, check your forward/reverse switch! It is remarkably easy to bump the lever into reverse accidentally.
- Leaving Hammer Mode OFF: Trying to drill brick in standard rotary mode will heat up the masonry bit until it turns red hot and melts the tip without making a hole.
- Using a Worn or Blunt Bit: Masonry bits are consumables. If the flattened carbide tip on the end of the bit feels rounded or chipped, throw it away and buy a fresh bit. A blunt bit generates extreme heat and risks cracking the surrounding brick face.
Common Beginner Mistakes (and Fixes)
| Mistake | What happens | The fix |
|---|---|---|
| Drilling without hammer mode | The bit polishes the brick and goes nowhere | Switch the collar to the hammer icon before you start |
| Using a wood or metal bit | The tip blunts in seconds and the hole never forms | Use a carbide-tipped masonry bit |
| Bit size not matching the plug | The plug spins loose, or splits when the screw goes in | Match bit to plug size — 6mm red plug = 6mm bit (sizing guide) |
| Drilling too shallow | The plug sticks out and the screw bottoms out | Go 5–10mm deeper than the plug; use the tape trick |
| Not cleaning the dust out | The plug won’t go in fully and grips poorly | Vacuum or blow out the hole first |
| Drilling in the mortar joint when you didn’t mean to | Weaker fixing that loosens over time | Aim for the middle of the brick face |
| Drilling too close to the brick edge | The brick face chips or cracks | Centre your hole on the brick, away from edges and joints |
What About SDS Drills? (Plain English)
You will see the letters “SDS” all over the place when you look at drills, This includes Screwfix listings, YouTube videos, and other guides. Here is the plain-English version, once, and then we can all move on.
SDS is a type of drill chuck (the bit-holding end of the drill) designed for heavy masonry drilling. The bit locks in and out of the chuck slightly while a much more powerful hammer action hits it, so SDS drills punch into brick and concrete far faster than a combi drill can. If you spent all day, every day, drilling walls, or you need lots of large, deep holes in concrete, an SDS drill is what you would buy.
You can read my article here on which cutter bits to use on an SDS drill.
For UK home DIY, you almost certainly do not need one. A combi drill with hammer mode and a decent masonry bit will handle shelves, brackets, curtain poles, mirrors, radiators and TVs in solid brick, block and most walls you will meet.
Your combi drill is also the same tool that assembles your furniture and drives your screws. An SDS drill does one thing. Cross that bridge only if you find yourself drilling into concrete regularly, and by then you will know.
What Kind of Walls do You Have?
UK homes have several different wall types, and the drilling approach changes slightly for each. Before you drill anything, spend two minutes identifying what you are dealing with.
Solid brick
Most British houses built before the 1920s, and many since, have solid brick walls These are two rows of bricks laid in alternating patterns (called Flemish or English bond) with mortar between them. You can usually spot the brick pattern through the interior plaster in older homes, or from the outside of the house.
Drilling difficulty: Easy to moderate. A combi drill with hammer mode handles solid brick without any trouble.
Cavity wall (brick outer, block inner)
Most homes built after the 1920s have two skins. There is a brick outer wall and a lightweight block inner wall, with a gap (the cavity) between them. Indoors, you are usually drilling into the inner block, not the brick.
Drilling difficulty: Easy. The inner blocks are softer than brick and drill quickly. The main thing is not to drill so deep that you bridge the cavity — use the correct plug length for the inner skin.
Thermalite / breeze / aerated blocks
These grey or white lightweight blocks are common in extensions, newer internal walls and garages. They are so soft you can almost mark them with a fingernail.
Drilling difficulty: Very easy — but plugs can work loose. Use a standard wall plug, but if it feels loose in the hole, use a slightly larger plug or a frame fixing designed for lightweight blocks.
Engineering bricks
The dark blue or dark red bricks you sometimes see on house foundations, older sills, garden walls and factory buildings are engineering bricks and have been fired extremely hard. A standard masonry bit will drill them eventually, but it is slow going and blunts bits fast.
Drilling difficulty: Hard. For a one-off, a sharp quality masonry bit and patience will get there. For repeated fixing into engineering brick, drill into the mortar joint instead.
Final Verdict
Drilling into UK brick walls is a technique job, not a strength job. Get the checks right (cable detector first, every time). If safe to proceed use a combi drill in hammer mode with a carbide masonry bit the same size as your wall plug, aim for the middle of the brick, and drill a touch deeper than the plug before cleaning out the hole.
Once you have done it two or three times, it becomes muscle memory. Every shelf, bracket and curtain pole in your home becomes a ten-minute job instead of a mystery.
Frequently Asked Questions
Can I drill into brick without a hammer drill?
Technically, a standard rotary drill can slowly scrape through soft mortar joints, but it cannot drill into hard red brick or concrete. Trying to drill brick without hammer action will destroy standard drill bits within seconds.
Why is my wall plug sticking out of the hole?
Your hole isn’t deep enough, or compacted brick dust is trapped at the bottom of the hole. Pull the plug out, insert the masonry bit back into the hole to clear the debris, or drill a few millimetres deeper.
What do I do if the brick crumbles and the hole becomes too large?
If you hit a soft spot or air pocket in the brick, upgrade to the next size up. Remove the loose plug, drill out the hole using a 7mm bit, and insert a Brown 7mm Wall Plug with a thicker screw.
Next Steps & Related Guides
This article is part of our [Ultimate Beginner’s Guide to Combi Drills]. Explore more of our hands-on guides below: