
How to Cut Plywood With a Circular Saw
A circular saw is one of the easiest power tools to use for cutting plywood, particularly when you need to make long, straight cuts through large sheets.
Plywood is available in different thicknesses and grades, so the best cutting approach can depend on the sheet you’re working with. For most DIY projects, however, the basic process is straightforward: measure and mark the cut, support the plywood properly, use a suitable blade and guide the saw steadily through the material.
One of the main challenges when cutting plywood is getting a clean edge without excessive splintering. The right blade and cutting technique can make a noticeable difference, especially when the finished edge will be visible.
Quick Answer
If you’re wondering how to cut plywood with a circular saw, start by:
- Choosing a blade suitable for plywood and the finish you want.
- Measuring and marking the cut accurately.
- Supporting the plywood securely so it doesn’t move or flex excessively.
- Setting the saw to an appropriate cutting depth.
- Using a straightedge or guide for accurate long cuts.
- Moving the saw steadily without forcing it through the plywood.
- Taking extra care to minimise splintering if you need a clean finished edge.
For most DIY beginners, a suitable fine-tooth or plywood blade combined with a straight guide is a good starting point.
In the rest of this guide, we’ll look at the equipment you need, how to set up the plywood, which blade to use and how to make cleaner, more accurate cuts.
What You Need Before Cutting Plywood
Before you start cutting, it’s worth getting everything ready. A few minutes of preparation can make the cut easier to control and help you achieve a cleaner result.
Essential Equipment
For most DIY plywood cuts, you’ll need:
- Circular saw suitable for the thickness of the plywood.
- Plywood or fine-tooth blade suitable for the material.
- Tape measure for accurate measurements.
- Pencil for marking the cutting line.
- Straightedge or guide rail for longer, accurate cuts.
- Suitable supports to keep the plywood stable.
- Safety equipment, including appropriate eye and hearing protection.
You may also find a square useful when marking shorter cuts across the sheet.
Check the Blade Before Cutting
Before starting, make sure the blade is suitable for plywood and is in good condition.
A blade with more teeth will generally produce a cleaner finish than a coarse construction blade, although the best choice depends on the type of plywood and the finish you need.
If you’re unsure which blade to choose, see my guide to the best circular saw blades for DIY UK.
Check the Saw and Cutting Depth
Check that the saw is in good working order and that the blade is fitted correctly according to the manufacturer’s instructions.
You should also check the available cutting depth against the thickness of the plywood. If you’re unsure about cutting capacity, my guide to how deep a circular saw can cut explains how blade size and cutting angle affect cutting depth.
Prepare Your Working Area
Make sure you have enough room to handle the plywood safely. Large sheets can be awkward to move and support, so plan where you’ll place the sheet before you start.
Keep the cutting area clear and make sure there is nothing underneath the plywood that could be damaged by the blade. Once everything is prepared, you’re ready to measure and mark your cut.
You may also find the HSE policy on using work equipment useful.
What Circular Saw Blade Is Best for Plywood?

The blade you use can make a big difference when cutting plywood. A suitable blade can help produce a cleaner edge and reduce splintering, particularly when the cut will be visible.
For most DIY projects, a fine-tooth circular saw blade designed for plywood or wood sheet materials is a good choice.
Tooth Count Matters
As a general guide:
- 24T: Faster cuts, but usually a rougher edge.
- 30–40T: Good general-purpose choice for many DIY plywood cuts.
- 50–60T+: Better suited to cleaner, more finished cuts.
The exact result will depend on the blade design, plywood type and thickness, as well as how the saw is used.
For a beginner who wants a good balance between cutting speed and finish, around 40 teeth is often a sensible starting point.
Check Blade Compatibility
Before buying a blade, make sure it is compatible with your circular saw.
Check:
- Blade diameter
- Bore size
- Maximum RPM
- Material suitability
- Number of teeth
- Whether the blade is suitable for your particular saw
Don’t assume that a blade will fit simply because it is marketed for circular saws.
If you’re choosing between different tooth counts and blade types, my Best Circular Saw Blades for DIY UK guide explains the differences in more detail.
Choose the Blade for the Finish You Need
You don’t necessarily need the finest blade available for every plywood project. If you’re building something where the edge will be hidden, a faster-cutting blade may be perfectly adequate.
If you’re making furniture, shelving or another project where the plywood edge will be visible, a finer-tooth blade may be worth using.
The key is to match the blade to both the plywood and the finish you want, rather than automatically choosing the blade with the highest tooth count.
How to Mark Plywood for a Straight Cut
How to cut plywood with a circular saw depends largely on using the right blade, supporting the sheet properly and keeping the saw moving steadily.
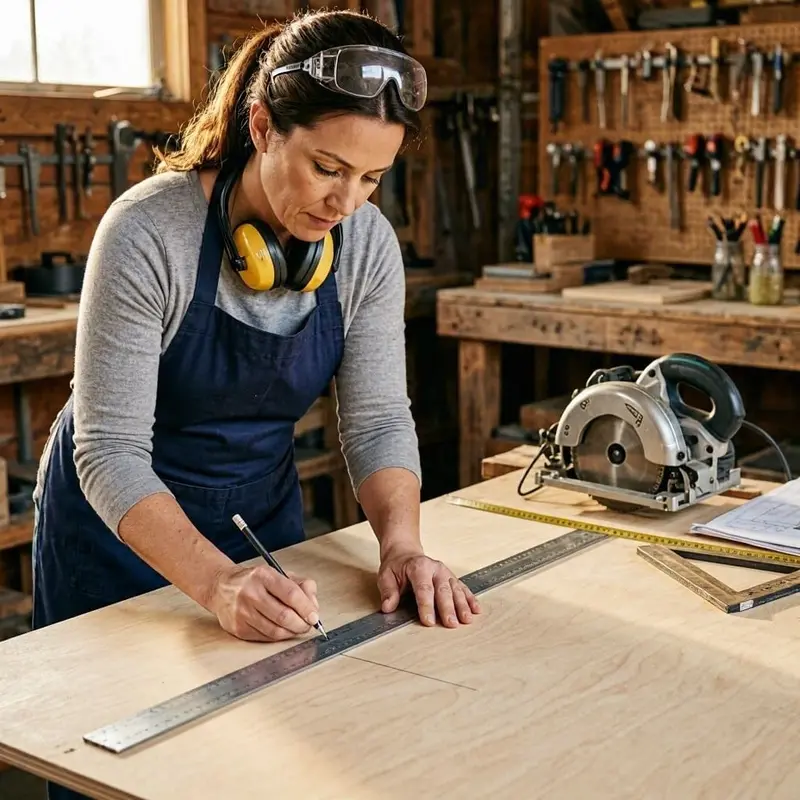
Accurate marking is the first step towards getting a straight plywood cut. Even a good circular saw and guide won’t produce the result you want if the cutting line is in the wrong place.
Measure Carefully
- Start by measuring the required length or width of the plywood.
- Use a tape measure and mark the measurement clearly with a sharp pencil. For a cross-cut, a square can help you create a straight line across the sheet.
- For longer cuts, mark both ends of the intended cutting line before joining the marks with a straightedge.
Mark the Waste Side
Before cutting, identify which side of the line is the waste piece. A simple X on the waste side can help prevent confusion, particularly when you’re making several measurements on a large sheet.
Remember that the circular saw blade removes a small amount of material as it cuts. This is known as the kerf.
When accuracy matters, make sure you’re measuring to the correct side of the cutting line rather than assuming the blade will cut directly through the centre of your pencil mark.
Check the Measurement Before Cutting
Before positioning your guide, take a moment to check:
- The measurement is correct.
- The cutting line is clearly visible.
- The waste side is identified.
- The guide will be positioned correctly.
- The blade path is clear.
- The plywood is properly supported.
This simple check can prevent an expensive mistake. For long plywood cuts, accurate marking becomes even more important because a small measurement error at one end can affect the entire cut.
How to Support Plywood Before Cutting
Properly supporting the plywood is one of the most important steps when making a cut. Large sheets can flex, move or sag if they aren’t supported correctly, making it harder to keep the circular saw under control.
Support the Sheet Across the Cutting Area
Place the plywood on a stable work surface or suitable supports that allow the saw to pass through the material without hitting the supports underneath. The aim is to keep the sheet stable while still providing enough clearance for the blade.
For a large sheet, make sure the supports are positioned so the plywood doesn’t sag excessively as you move across it.
Prevent the Plywood From Moving
The plywood should remain stable while you’re cutting. Depending on your setup, this may mean using suitable clamps or another secure method of holding the material in position. Make sure anything used to secure the plywood doesn’t interfere with the saw, guide or blade path.
Think About the Offcut
Consider what will happen to the piece you’re cutting away. The offcut shouldn’t be allowed to move in a way that interferes with the saw or causes the main sheet to shift during the cut.
Before starting, check:
- The plywood is properly supported.
- The cutting line is accessible.
- The guide can be positioned securely.
- The blade path is clear underneath.
- The offcut has enough space.
- Nothing underneath the sheet can be damaged.
Large Sheets Need Extra Planning
A full sheet of plywood can be awkward to handle, particularly if you’re working alone. Take your time positioning it before you start rather than trying to adjust the sheet once you’re already cutting.
Good support makes straight plywood cuts much easier. Once the sheet is stable and your cutting line and guide are ready, you can concentrate on making a smooth, controlled cut.
How to Set the Correct Cutting Depth
Setting the correct cutting depth is important when cutting plywood with a circular saw. The blade needs enough capacity to cut through the sheet, but you don’t simply need to use the maximum depth available.
Check the Plywood Thickness
First, measure or check the thickness of the plywood you’re cutting.
Common UK DIY plywood thicknesses include:
- 6mm
- 9mm
- 12mm
- 18mm
- 25mm
Your circular saw should have enough cutting capacity for the thickness you’re working with.
Set the Saw Correctly
Follow your circular saw manufacturer’s instructions when adjusting the cutting depth. As a general principle, the blade should be set to cut through the plywood without unnecessarily extending far beyond the underside of the sheet.
A suitable setting can help maintain control and reduces unnecessary blade exposure below the material.
Check the Blade Path
Before starting the cut, look underneath the plywood and make sure the blade path is clear. Check that the blade won’t contact:
- Work supports
- Your workbench
- Clamps
- Other tools
- Cables
- Anything else underneath the sheet
This is particularly important when cutting large sheets, because the supports may be positioned beneath different parts of the plywood.
Bevel Cuts Are Different
If you’re making a bevel cut rather than a standard 90-degree cut, the saw’s maximum cutting depth will normally be reduced.
If you’re unsure whether your saw has enough capacity for a particular plywood thickness, check the manufacturer’s specifications for the maximum cutting depth at the angle you’re using.
For a straightforward beginner project, setting the saw correctly before you start is a small step that can make the rest of the cut much easier.
How to Cut Plywood Straight With a Circular Saw
If you’re learning how to cut plywood with a circular saw, practising on a piece of scrap plywood first can help you get cleaner results.
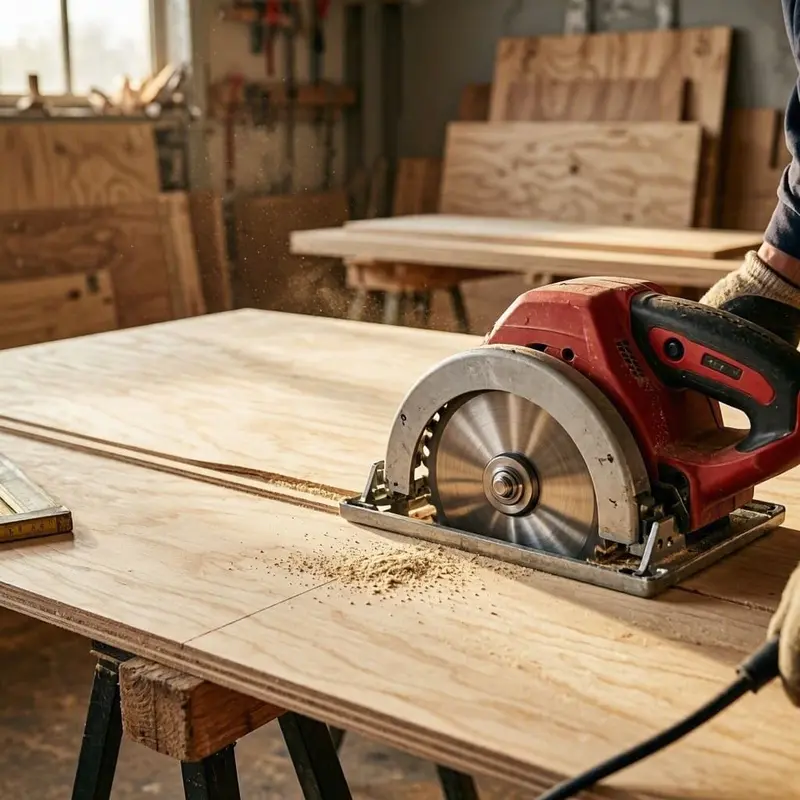
Once the plywood is properly supported, marked and ready to cut, the next step is making the actual cut.
For beginners, using a straightedge or guide rail is usually the easiest way to keep a circular saw travelling in a straight line.
Position the Saw
Place the saw so the blade is aligned correctly with your cutting line or guide.
Before starting, check that:
- The saw is positioned correctly.
- The plywood is secure.
- The guide is firmly in place.
- The blade path is clear.
- You have a stable working position.
- The power cable or battery is safely positioned.
Start the Cut
Follow the manufacturer’s instructions for starting your particular circular saw.
Allow the blade to reach its normal operating speed before progressing into the plywood.
Keep the saw’s base firmly positioned against your guide if you’re using one, and begin moving forward steadily.
Keep the Cut Steady
Let the saw do the work rather than forcing it through the plywood.
Try to maintain a consistent pace and avoid sudden changes in direction. If the saw begins to move away from the intended line, don’t try to force it back aggressively. Stop and reassess the setup if necessary.
For a long plywood cut, concentrate on keeping the saw properly positioned against the guide throughout the cut.
Finish the Cut Carefully
As you approach the end of the sheet, continue to maintain control of the saw.
Once the cut is complete, follow the manufacturer’s instructions for switching the saw off and allow the blade to stop before moving or setting the saw down.
If you’re cutting plywood for a visible finished project, the next challenge is usually preventing splintering along the cut edge.
How to Prevent Plywood From Splintering
One of the biggest challenges when cutting plywood is getting a clean edge without excessive splintering. This is particularly important when the cut edge will be visible on furniture, shelving or other finished DIY projects.
There are several things you can do to improve the result.
Use the Right Blade
Blade choice is one of the most important factors.
A finer-tooth blade designed for plywood or sheet materials will generally produce a cleaner edge than a coarse construction blade.
For more information, see our guide to [the best circular saw blades for DIY UK].
Cut With the Better Face Positioned Correctly
Think about which face of the plywood will be visible when the project is finished.
Circular saws can produce different levels of breakout on the entry and exit sides of the cut, so positioning the sheet appropriately can help put the cleaner-looking edge where you need it.
If the appearance of both sides matters, test your chosen blade and cutting method on an offcut first.
Keep the Blade in Good Condition
A worn or damaged blade can make it harder to achieve a clean cut.
If you’re getting excessive splintering despite using a suitable blade, check the blade condition and make sure it’s appropriate for the plywood you’re cutting.
Keep the Saw Moving Steadily
Avoid forcing the saw or making sudden changes in speed.
A smooth, controlled cut can help produce a more consistent edge. Let the blade do the cutting rather than pushing aggressively through the plywood.
Consider a Test Cut
Plywood varies considerably in quality, thickness and construction.
If you’re working on an important project, make a test cut on a scrap piece of the same plywood first. This lets you see how your particular blade and saw perform before making the final cut.
For the cleanest results, blade choice, correct setup and controlled cutting technique all work together.
How to Cut Large Sheets of Plywood
Large sheets of plywood can be awkward to handle, but a circular saw is well suited to making long cuts when the sheet is properly supported.
The key is to plan the cut before you start rather than trying to manage the sheet while the saw is running.
Support the Sheet Properly
Make sure the plywood is supported across the area you’re cutting.
Large sheets can flex or sag, so use suitable supports that keep the material stable while leaving enough clearance for the blade.
Before cutting, check that the supports won’t interfere with the blade path.
Use a Long Guide
For long cuts, a straightedge or guide rail can make the job considerably easier.
Measure the distance between the guide and the saw blade carefully, then position the guide so the blade follows your intended cutting line.
Secure the guide so it cannot move during the cut.
Plan the Cut
Before switching on the saw, check:
- Your measurements are correct.
- The cutting line is clearly marked.
- The waste side is identified.
- The plywood is properly supported.
- The guide is securely positioned.
- The blade path is clear.
- You have enough room to move the saw smoothly.
Don’t Rush a Large Sheet
A long cut can take more time than a short piece of timber, so don’t try to speed things up by forcing the saw.
Keep the saw moving steadily and maintain contact with the guide throughout the cut.
If the plywood moves, the guide shifts or the saw becomes difficult to control, stop and reassess the setup before continuing.
For beginners, good support and a reliable guide are particularly valuable when cutting full sheets of plywood.
How to Cut Thick Plywood
Thicker plywood requires a little more attention to the saw’s cutting capacity, blade choice and material support.
Before cutting, check the actual thickness of the plywood and compare it with your circular saw’s maximum cutting depth at the angle you’re using.
Check Your Saw’s Cutting Capacity
Circular saws come in different sizes, so their maximum cutting depths can vary.
A typical 165mm circular saw may provide around 55–57mm of cutting depth at 90°, while larger 184mm or 185mm saws may provide around 60–65mm. However, these are general ranges rather than guarantees.
Always check your particular saw’s manufacturer specifications.
Use a Suitable Blade
Thicker plywood can put more demand on the saw and blade, so make sure you’re using a blade suitable for the material.
A blade designed for plywood or sheet materials can help produce a cleaner edge than a coarse construction blade when appearance matters.
Support the Plywood Carefully
Thicker sheets can be heavy, so make sure the plywood is properly supported before starting the cut.
You want the material to remain stable throughout the cut rather than shifting or sagging as the saw moves through it.
Don’t Force the Saw
If the saw starts struggling, don’t simply push harder.
Maintain a controlled cutting speed and allow the saw and blade to do the work. If you’re unsure whether the saw is suitable for the thickness of plywood, stop and check the manufacturer’s specifications.
For particularly thick plywood or demanding cuts, using a saw with sufficient cutting capacity is more important than simply trying to make the cut with a smaller saw.
How to Make Repeated Plywood Cuts
If you’re cutting several pieces of plywood to the same size, setting up a consistent method can save time and help keep the finished pieces accurate.
The key is to make your first cut carefully and then use a reliable reference for the remaining pieces.
Measure the First Piece Carefully
Take your time with the first measurement and check it before making the cut.
Once the first piece has been cut, measure it to confirm that the size is correct before continuing.
Use a Consistent Reference
For repeated cuts, you can use a suitable stop, guide or other fixed reference to help maintain the same measurement.
Make sure the reference is secure and doesn’t interfere with the circular saw or blade path.
Don’t Assume Every Cut Is Identical
It’s worth checking the first few pieces as you go.
Place the pieces together or measure them individually to make sure they’re matching. If there is a small error in your setup, you’ll catch it before cutting the entire batch.
Keep Your Setup Consistent
Try to use the same:
- Measuring point
- Cutting line
- Guide position
- Saw setup
- Cutting technique
This makes repeated cuts more predictable and reduces the chance of gradually introducing measurement errors.
For DIY projects such as shelving, cabinets or simple furniture, a consistent cutting setup can make repeated plywood cuts much quicker and more accurate.
Common Mistakes When Cutting Plywood
Cutting plywood with a circular saw is fairly straightforward, but a few common mistakes can lead to poor cuts, excessive splintering or difficulty controlling the saw.
1. Using the Wrong Blade
A coarse blade may cut plywood quickly but can produce a rougher edge and more splintering.
Choose a blade suitable for plywood or sheet materials and match the tooth count to the finish you want.
2. Poorly Supporting the Sheet
If the plywood moves, flexes or sags while you’re cutting, it becomes much harder to maintain a straight cut.
Take time to position suitable supports before starting.
3. Cutting Without a Guide
Trying to follow a long cutting line freehand can make it difficult to maintain accuracy.
For long cuts, particularly across large sheets, a straightedge or guide rail can make the job much easier.
4. Setting the Wrong Cutting Depth
Don’t automatically set the saw to its maximum depth.
Check the plywood thickness and adjust the saw according to the manufacturer’s instructions. Also make sure the blade path beneath the sheet is clear.
5. Rushing the Cut
Trying to push through the plywood too quickly can make the saw harder to control.
Use a steady, controlled movement and let the blade do the work.
6. Ignoring Splintering
If the finished edge matters, don’t wait until after the cut to discover that your blade and technique are producing excessive breakout.
Make a test cut on scrap plywood first if you’re unsure how your chosen blade will perform.
7. Failing to Check Measurements
A perfectly straight cut in the wrong place is still a mistake.
Double-check your measurement, cutting line and waste side before starting.
8. Forgetting About the Blade Kerf
Remember that the blade removes a small amount of material as it cuts.
When accuracy is important, account for the blade’s kerf when marking and positioning your cut.
9. Not Checking the First Repeated Cut
If you’re making several identical pieces, check the first one before continuing with the rest.
This can prevent a small setup or measurement error from being repeated throughout the project.
Good preparation prevents most plywood-cutting problems. Take your time, use the right blade, support the sheet properly and use a guide when accuracy matters.
Tips for Getting Cleaner Plywood Cuts
If you want your plywood cuts to look neat and professional, a few simple techniques can make a noticeable difference.
Choose the Right Blade
For clean plywood cuts, use a blade designed for plywood or sheet materials.
A higher tooth count will generally produce a finer cut than a coarse construction blade, although the best choice depends on the plywood and the finish you need.
Make a Test Cut
Before cutting your finished piece, try the blade on an offcut from the same sheet.
This lets you check for:
- Splintering
- Tear-out
- Cut quality
- Blade suitability
- Whether your cutting technique needs adjusting
Use a Guide for Long Cuts
A straightedge or guide rail helps keep the saw travelling consistently.
This is particularly useful for large sheets where even a small change in direction can result in a noticeably uneven edge.
Support the Plywood Properly
Good support helps prevent the sheet from moving or flexing during the cut.
Make sure your supports are positioned safely and won’t interfere with the blade.
Keep Your Cutting Speed Consistent
Avoid rushing through the plywood.
A steady, controlled movement usually produces a more consistent result than trying to push the saw through as quickly as possible.
Mark the Finished Face
If one side of the plywood will be visible in the finished project, think about which face should receive the cleaner cut.
Because circular saws can produce different amounts of breakout on different sides of the cut, testing your setup on scrap first is a sensible approach.
Take Your Time
The cleanest plywood cuts usually come from a combination of the right blade, accurate marking, proper support and controlled cutting.
You don’t need expensive equipment to get good results. A suitable circular saw and blade, combined with a reliable guide and careful preparation, can be enough for many DIY projects.
Frequently Asked Questions
Can I cut plywood with a circular saw?
Yes. A circular saw is well suited to cutting plywood, particularly for straight cuts through sheets and boards. Using a suitable blade and proper support will help you achieve better results.
What is the best circular saw blade for plywood?
For many DIY projects, a fine-tooth blade designed for plywood or sheet materials is a good choice. Around 40 teeth can provide a useful balance between cutting speed and finish, while higher-tooth-count blades can be preferable when a cleaner edge is important.
How do I stop plywood from splintering?
Use a suitable fine-tooth blade, support the plywood properly and make a controlled cut. Testing the blade on a scrap piece first can help you find the best setup for your particular plywood.
Should I cut plywood face up or face down?
The best orientation can depend on the saw, blade and the finish you need. Circular saws can produce different amounts of breakout on the entry and exit sides of the cut, so it’s sensible to test your setup on an offcut before cutting the finished piece.
Can a 165mm circular saw cut plywood?
Yes. A 165mm circular saw has more than enough cutting capacity for many common plywood thicknesses, including typical 12mm and 18mm sheets. Always check your particular saw’s maximum cutting depth.
Can I cut a full sheet of plywood with a circular saw?
Yes. A circular saw can be a practical way to cut full sheets of plywood. The main challenge is supporting the sheet properly and using a suitable guide for accurate long cuts.
How do I cut plywood straight with a circular saw?
Measure and mark the plywood carefully, support it securely and use a straightedge or guide rail for the best results. Keep the saw moving steadily along the guide rather than trying to correct the direction with sudden movements.
Why does my plywood splinter when I cut it?
Splintering can be caused by the blade type, tooth count, blade condition, plywood construction or cutting technique. A suitable finer-tooth blade and a controlled cut can often improve the result.
Can I cut thick plywood with a circular saw?
Yes, provided your circular saw has sufficient cutting capacity for the thickness of the plywood. Check the manufacturer’s specifications rather than relying solely on the blade diameter.
Is a circular saw better than a jigsaw for cutting plywood?
It depends on the cut. A circular saw is generally better suited to long, straight cuts, particularly through large sheets. A jigsaw is more useful when you need curved or shaped cuts.
Do I need a guide rail to cut plywood?
No, but a guide rail or straightedge is highly recommended for long, accurate cuts. It can make the job considerably easier for beginners and help produce a straighter finished edge.
Final Verdict
A circular saw is a practical and effective tool for cutting plywood, particularly when you need to make long, straight cuts through larger sheets.
For the best results, focus on the basics:
- Choose a blade suitable for plywood and the finish you want.
- Measure and mark carefully before cutting.
- Support the plywood properly so it doesn’t move or flex excessively.
- Set the correct cutting depth for the thickness of the sheet.
- Use a straightedge or guide rail for long, accurate cuts.
- Cut steadily without forcing the saw.
- Test your blade and setup on scrap material if the finished edge is important.
- Take extra care to reduce splintering when making visible finished cuts.
You don’t necessarily need an expensive circular saw or specialist equipment to cut plywood successfully. A suitable saw, the right blade and good preparation can produce excellent results for many DIY projects.
For beginners, the biggest improvement is often simply using a guide and taking your time. Once you have your measurements, support and blade choice right, cutting plywood with a circular saw becomes much more straightforward.
Looking for a New Circular Saw or Upgrading Your Setup?
For our full breakdown of top-rated corded and cordless tools, check out my Circular Saw Buying Guide UK for Beginners