Knowing how to cut straight with a circular saw is one of the most useful skills for DIY projects. Whether you’re cutting timber, plywood, MDF or other sheet materials, a straight cut makes the finished job look better and helps everything fit together properly.
The good news is that you don’t need to be an experienced carpenter to make accurate circular saw cuts. The key is good preparation, proper support and a reliable guide rather than trying to steer the saw perfectly by eye.
For beginners, using a straightedge, guide rail or suitable cutting guide is usually much easier than attempting a long cut freehand.
How to Cut Straight with a Circular Saw
Quick Answer
The easiest way to cut straight with a circular saw is to mark your cutting line, secure the material, set the correct cutting depth and use a straightedge or guide to keep the saw travelling in a consistent direction.
Before starting:
- Measure and mark the cut accurately.
- Support the material so it cannot move.
- Set the blade to the appropriate cutting depth.
- Position your guide correctly.
- Keep both hands on the saw where provided.
- Start the saw correctly and allow the blade to reach full speed.
- Move the saw steadily without forcing it through the material.
For short cuts, the saw’s built-in guide markings may be sufficient. For long or highly accurate cuts, a straightedge or guide rail can make a significant difference.
In this guide, I will explain how to cut straight with a circular saw and show you some simple techniques that can make accurate cuts much easier for a DIY beginner.
What You Need Before You Start
Before making a straight cut with a circular saw, it is worth spending a few minutes getting everything ready. Good preparation makes the cut easier, safer and more accurate. You don’t need lots of specialist equipment for most DIY jobs. The essentials are:
Circular Saw
Make sure your saw is suitable for the material you’re cutting and that the blade is appropriate for the job.
If you’re unsure which blade to use, see our guide to the best circular saw blades for DIY UK.
Suitable Cutting Guide
A straightedge, guide rail or suitable piece of straight timber can help keep the saw travelling in a straight line. For beginners, this is often the simplest way to improve accuracy, particularly when making longer cuts.
Tape Measure and Pencil
Use a tape measure to mark the cut accurately and a sharp pencil to create a clear cutting line. For sheet materials, measure from more than one point where practical so you can check that your line is positioned correctly.
Work Supports
The material needs to be properly supported while you cut it. You can use suitable sawhorses, a workbench or another stable support system, provided the material is secure and the blade won’t contact the support underneath.
Safety Equipment
Wear appropriate eye protection and consider hearing and respiratory protection depending on the material, environment and manufacturer’s guidance.
Keep the cutting area clear and make sure you have enough space to move the saw without becoming tangled in a cable or obstructed by other equipment.
Before You Cut
Take a moment to check:
- The correct blade is fitted.
- The blade is in good condition.
- The cutting depth is set appropriately.
- Your cutting line is clearly marked.
- The material is properly supported.
- Your guide is positioned correctly.
- The area around the cut is clear.
A few minutes spent setting everything up properly can make a much bigger difference to the accuracy of your cut than trying to correct the saw while you’re cutting.
Why Circular Saw Cuts Go Crooked
If your circular saw isn’t cutting in a straight line, it’s not necessarily because you’re doing something wrong. Several factors can cause the saw to wander away from your intended cutting line. Understanding these problems makes it much easier to prevent them.
1. Trying to Cut Freehand
The most common problem for beginners is trying to follow a pencil line entirely by eye. This can work for short cuts, but over a longer distance even a small movement can gradually move the saw away from the line.
For accurate longer cuts, a straightedge or guide rail is usually much easier.
2. Moving the Saw Too Quickly
Trying to push the saw through the material too quickly can make it harder to maintain control. Allow the blade to cut at a steady pace rather than forcing the saw forward. The correct cutting speed can depend on the material, blade and saw, so follow the manufacturer’s instructions.
3. The Material Moves During the Cut
If the timber or sheet material moves while you’re cutting, maintaining a straight line becomes much more difficult. Make sure the workpiece is properly supported and secured before you start.
4. The Blade Isn’t Suitable or Is Damaged
A blunt, damaged or unsuitable blade can make cutting more difficult and may affect the quality of the cut.
Choose a blade appropriate for the material and check that it is correctly fitted before use.
5. Incorrect Cutting Depth
Setting the blade excessively deep can make the saw harder to control and can increase the amount of material the blade has to pass through.
Set the cutting depth appropriately for the material and follow the manufacturer’s instructions.
6. The Guide Is Positioned Incorrectly
Even a good straightedge won’t help if it isn’t positioned correctly. Before cutting, measure carefully and check where the edge of the saw base will travel.
The blade doesn’t necessarily sit directly underneath the edge of the saw’s base, so account for the distance between the guide and the blade.
The Simple Solution
For most beginners, the easiest way to improve accuracy is to stop trying to steer the saw entirely by eye.
Mark your cut carefully, secure the material and use a properly positioned straightedge or guide. This gives the saw something consistent to follow and makes longer straight cuts much easier.
How to Mark a Straight Cutting Line
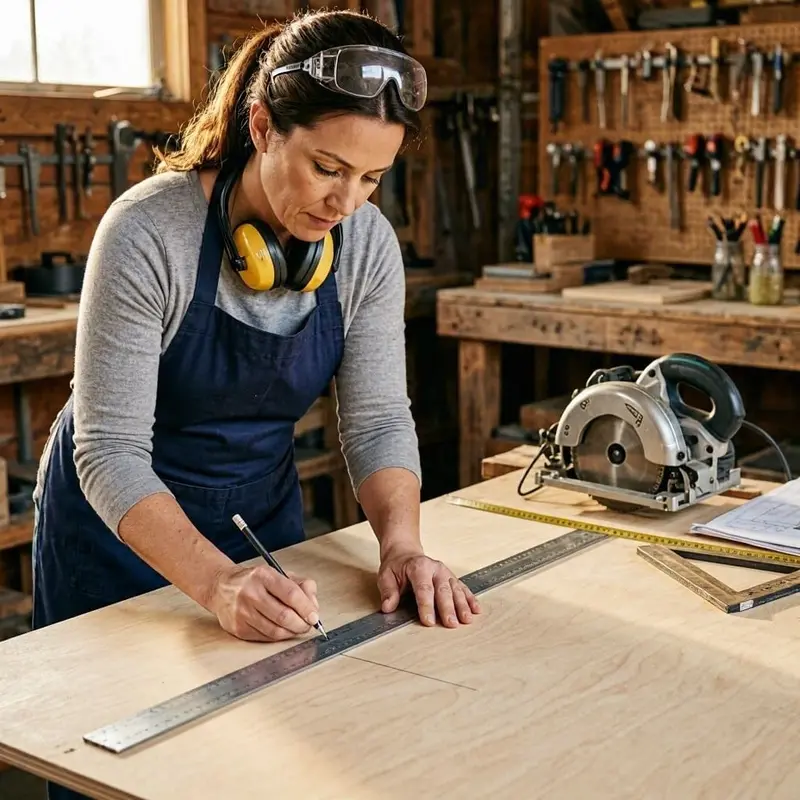
A straight cut starts with an accurate cutting line. Even the best circular saw and guide will not produce the result you want if the measurement or marking is wrong. For most DIY projects, a tape measure, pencil and straightedge are all you need.
Measure Carefully
Start by measuring the distance you need to cut. Make a clear mark at the required measurement rather than relying on a single quick pencil mark. For longer pieces, it can help to measure at both ends of the material and then connect the marks with a straightedge.
Draw the Cutting Line
Place your straightedge across the material and draw a clear line between your marks.
Keep the pencil line visible but reasonably thin. A very thick line can make it harder to judge exactly where the blade should travel.
Remember the Blade Position
One important point for beginners is that the edge of the saw’s base is not necessarily the same position as the blade. If you’re using a straightedge or guide, you need to account for the distance between the guide and the blade.
A simple way to do this is to:
- Measure where you want the finished cut.
- Position the saw so the blade is aligned with that measurement.
- Measure the distance from the edge of the saw base to your guide.
- Mark and position the guide using that measurement.
Always check the position before starting the saw.
Mark the Waste Side
If the exact finished dimension matters, it can help to identify which side of the line is the waste side.
The saw blade removes a small amount of material as it cuts, so you don’t want to accidentally remove material from the side you need to keep.
For beginners, clearly marking the waste side with a small X can make the cutting line easier to follow.
Double-Check Before Cutting
Before switching on the saw, check:
- Is the measurement correct?
- Is the cutting line in the right position?
- Is the waste side clearly identified?
- Is the guide positioned correctly?
- Is the material securely supported?
- Will the blade have a clear path through the material?
Taking a few extra seconds to check your measurements can save you from ruining a piece of timber or sheet material.
How to Use a Straightedge Guide
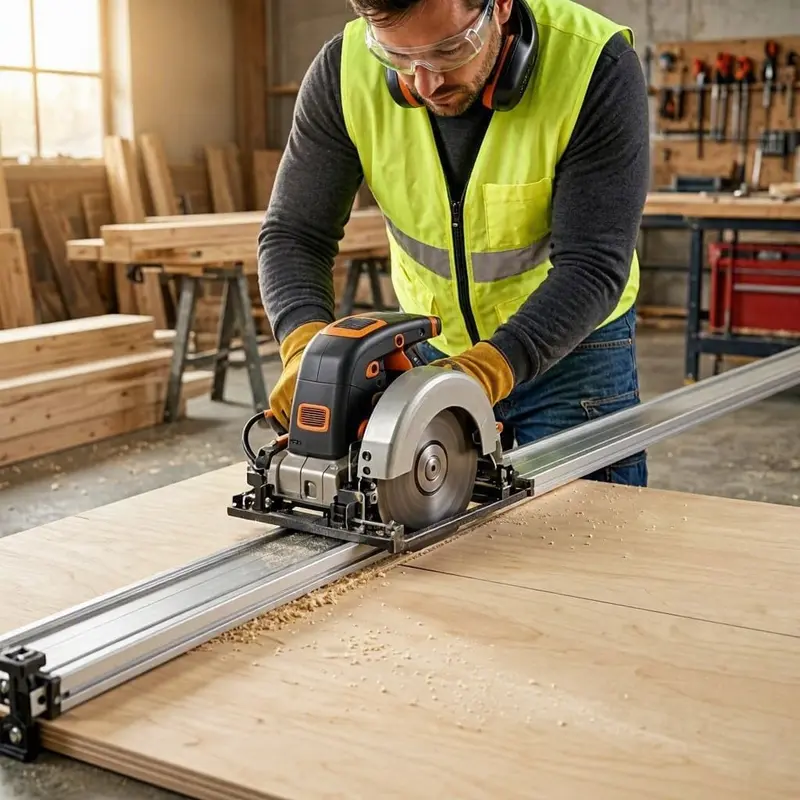
A straightedge guide is one of the easiest ways for a beginner to improve the accuracy of a circular saw cut.
Instead of trying to keep the saw perfectly aligned with a pencil line by eye, you give the saw a physical edge to follow.
What Can You Use as a Guide?
Depending on your project, you could use:
- A purpose-made circular saw guide rail
- A suitable straightedge
- A straight piece of timber
- A long, straight board with a reliable edge
The guide needs to be straight, stable and securely positioned. Avoid using anything warped or damaged, as this can transfer inaccuracies to your cut.
How to Position the Guide
The important part is positioning the guide at the correct distance from your cutting line. Remember that the blade isn’t directly underneath the edge of the saw’s base. The distance between the guide and the blade depends on the particular saw and how you position it.
A good approach is to make a quick test measurement before committing to your actual cut.
Position the saw against the guide and check where the blade will meet the material. Once you’re happy with the position, secure the guide so it cannot move.
Make Sure the Guide Is Secure
A guide that moves while you’re cutting defeats the whole purpose of using one.
Use suitable clamps or another appropriate method to keep the guide firmly in position, while making sure the clamps won’t interfere with the saw or its path.
Before starting the cut, gently check that the guide is secure.
Keep the Saw Against the Guide
When cutting, keep the appropriate edge of the saw’s base consistently against the guide. Move the saw steadily along the guide rather than repeatedly pulling it away and trying to correct the direction.
The guide should help control the direction of travel, allowing you to concentrate on maintaining a steady, controlled cut.
A Guide Makes Long Cuts Much Easier
For a short piece of timber, you may be able to follow a marked line without a guide. For long cuts, wide boards and sheet materials, however, a straightedge or guide rail can make a noticeable difference to accuracy.
For a beginner, it’s one of the simplest ways to get more consistent results without needing advanced cutting skills.
How to Set the Correct Cutting Depth
Setting the correct cutting depth is important when using a circular saw. The blade should be deep enough to cut through the material cleanly, without being set unnecessarily deep.
Before making your cut, check the thickness of the material and adjust the saw’s depth setting according to the manufacturer’s instructions.
As a general guide:
- Thin boards and sheet materials: Set the depth just beyond the material thickness.
- Timber: Check the actual thickness of the timber and make sure the saw has enough cutting capacity.
- Thicker materials: Confirm that the saw can cut through the material at the angle you intend to use.
- Bevel cuts: Remember that the maximum cutting depth is usually lower when the saw is set at an angle.
For example, if you’re cutting a board that is around 25mm thick, a saw with considerably more than 25mm of available cutting depth has enough capacity for the job. You should still follow the saw manufacturer’s instructions when setting the depth.
Check the Blade Path
Before starting the saw, make sure you know where the blade will travel through the material. The blade should have enough clearance beneath the workpiece and should not contact your work surface, supports or anything else underneath.
If you’re unsure about the correct depth setting, check the manufacturer’s instructions or product specification before cutting.
Getting the depth right is a simple step, but it can make your cuts easier to control and helps you avoid unnecessary contact between the blade and your work surface.
How to Position and Support Your Timber
Good support is one of the most important parts of making a straight circular saw cut. If the timber or board moves while you’re cutting, it becomes much harder to keep the saw on your cutting line.
Support the Material Properly
Place the timber or sheet material on a stable work surface or suitable supports so it cannot move around easily.
For longer pieces, use enough support to prevent the material from sagging significantly. When cutting sheet materials, make sure the area you’re cutting is properly supported rather than leaving large sections unsupported.
Keep the Offcut in Mind
Think about what happens to the piece you’re cutting away.
You want the material to remain stable throughout the cut, without the offcut interfering with the saw or causing the material to move unexpectedly.
Before starting, check:
- The main piece is securely supported.
- The cutting line is accessible.
- Your guide is firmly positioned.
- The blade path is clear underneath.
- The offcut has somewhere safe to go.
- Nothing underneath the material can be damaged by the blade.
Avoid Cutting Unsupported Material
A common beginner mistake is allowing a board to hang too far beyond its support. As the cut progresses, the material can move or change position, making it much harder to achieve a clean, straight cut.
Taking a little extra time to position and support the material properly can make a big difference to both accuracy and control.
Once everything is supported and your guide is in position, you’re ready to make the cut.
How to Make a Straight Cut
Learning how to cut straight with a circular saw becomes much easier once your material is properly supported and your guide is correctly positioned.
Start by placing the circular saw so the blade is aligned with your cutting line. If you’re using a straightedge or guide, make sure the saw’s base is positioned correctly against it.
Before switching the saw on, check that:
- The blade is clear of the material where appropriate.
- Your cutting line and guide are correctly positioned.
- The material is securely supported.
- The cable or battery is safely positioned.
- You have a stable stance and clear working area.
Start the Cut Correctly
Follow the manufacturer’s instructions for starting your particular saw. Allow the blade to reach its normal operating speed before progressing into the cut.
Keep the saw firmly controlled and begin moving along the cutting line or guide.
Keep the Saw Moving Steadily
Let the saw do the work rather than trying to force it through the material.
Move at a steady, controlled pace while keeping the saw’s base properly positioned. If you’re using a straightedge, maintain contact with the guide throughout the cut.
Avoid rushing, twisting the saw or trying to correct the direction with sudden movements.
If the saw starts to move away from the intended line, stop and reassess rather than trying to force it back into position.
Finish the Cut Under Control
As you approach the end of the material, maintain control of the saw and continue following the cutting line.
Once the cut is complete, follow the manufacturer’s instructions for switching the saw off and allow the blade to stop before moving or setting the saw down.
For beginners, the combination of accurate marking, good material support and a straightedge guide is usually much easier than trying to steer the saw freehand.
How to Cut Large Sheets Straight
Cutting large sheets of plywood, MDF or OSB can be more challenging than cutting smaller pieces of timber. The size of the material makes it harder to keep everything stable, so good support and a suitable guide become especially important.
Support the Sheet Properly
Before cutting, make sure the sheet is well supported across its surface.
Avoid leaving large sections unsupported, as the sheet can flex or move as the cut progresses. Position your supports so the material remains stable while still allowing the blade to pass through safely.
Use a Long Straightedge or Guide Rail
For long cuts, a straightedge or guide rail can make a big difference.
Measure from the cutting line to the edge of the saw’s base and position the guide accordingly. Always double-check this measurement before securing the guide.
For long sheet cuts:
- Mark your cutting line.
- Position the guide at the correct distance from the line.
- Secure the guide so it cannot move.
- Check the blade path and material support.
- Start the saw according to the manufacturer’s instructions.
- Keep the saw base against the guide as you make the cut.
- Move steadily without forcing the saw.
Take Your Time
Large sheets can be awkward to handle, particularly if you’re working alone. Don’t rush the cut simply because you want to get through the material quickly.
If the sheet starts moving, the saw becomes difficult to control or something doesn’t look right, stop and reassess the setup.
For DIY beginners, proper support and a straight guide are usually much more important than trying to cut a large sheet freehand.
How to Make Repeated Straight Cuts
If you’re cutting several pieces of timber to the same length, setting up a simple repeatable method can save time and help keep your cuts consistent.
Instead of measuring and marking every piece from scratch, you can use the first accurately cut piece as a reference or set up a suitable stop or guide.
Measure the First Piece Carefully
Take your time with the first measurement. Check the length twice before making the cut.
Once the first piece is cut, use it to confirm that your measurement is correct before cutting the remaining pieces.
Use a Consistent Reference
For repeated cuts, a fixed reference point can help you achieve more consistent results.
Depending on the project, you might use:
- A suitable stop block
- A straightedge or guide
- A marked reference point
- The first accurately cut piece
The important thing is that the reference remains secure and doesn’t interfere with the circular saw or blade path.
Check the First Few Cuts
Don’t assume that every cut will automatically be identical.
After making the first few cuts, place the pieces together and check their lengths. If something is slightly wrong, it’s much better to discover the problem early rather than after cutting an entire batch.
For beginners, accurate measuring and a consistent reference point are usually the simplest ways to make repeated straight cuts more efficiently.
Freehand Cutting vs Using a Guide
You can cut straight with a circular saw freehand, but for beginners, using a guide is usually the easier way to achieve accurate results.
Freehand Cutting
Freehand cutting means following your marked cutting line without using a straightedge or guide rail.
This can work well for:
- Short cuts
- Rough construction work
- Cuts where absolute accuracy isn’t critical
- Experienced users who are comfortable controlling the saw
The main challenge is keeping the saw moving consistently along the line. Even a small change in direction can become noticeable over a longer cut.
Using a Straightedge or Guide
A straightedge gives the saw a physical reference to follow.
This is particularly useful for:
- Long cuts
- Plywood and sheet materials
- Shelving
- Furniture projects
- Cuts where accuracy matters
For most DIY beginners, a guide is a worthwhile addition because it reduces the need to constantly judge the cutting direction by eye.
Which Should You Choose?
If you’re learning how to use a circular saw, I’d recommend using a straightedge or guide whenever practical.
Freehand cutting has its place, but a good guide can make straight cuts much easier and more repeatable. It also helps you concentrate on maintaining steady control rather than constantly trying to correct the direction of the saw.
Common Mistakes to Avoid
Even with a good circular saw and the right blade, a few simple mistakes can make straight cuts more difficult. Fortunately, most are easy to avoid.
1. Cutting Without Proper Support
If the timber or sheet moves while you’re cutting, keeping the saw straight becomes much harder.
Make sure the material is properly supported and secure before you begin.
2. Trying to Cut Too Quickly
Pushing the saw too quickly can make it harder to maintain control and follow your cutting line.
Use a steady, controlled movement and let the saw do the work.
3. Relying on the Cutting Line Alone
A pencil line is useful, but following a long line freehand requires more concentration and control.
For longer or more accurate cuts, use a suitable straightedge or guide.
4. Positioning the Guide Incorrectly
One of the easiest mistakes to make is measuring from the wrong part of the saw.
Remember that the guide usually sits beside the saw rather than directly on the cutting line. Measure the distance between the guide and the blade carefully before securing it.
5. Using the Wrong Blade
A blade that isn’t suitable for the material can make cutting more difficult and may produce a poorer finish.
Choose a blade appropriate for the material and the type of cut you’re making. If you’re unsure which blade to use, see our guide to [the best circular saw blades for DIY UK].
6. Setting the Wrong Cutting Depth
Don’t simply set the blade to its maximum depth for every cut.
Check the material thickness and set the cutting depth according to the saw manufacturer’s instructions.
7. Trying to Force the Saw
If the saw begins to struggle, don’t simply push harder.
Stop and check the setup, blade, material and cutting conditions before continuing.
8. Rushing the End of the Cut
The final part of a cut still requires control. Maintain your position and follow the manufacturer’s instructions for safely finishing the cut.
A little extra preparation before starting can prevent many of these problems. For beginners, accurate measuring, good support and a reliable guide are three of the biggest improvements you can make to your straight cuts.
For more information on using work equipment safely, see the HSE guidance on using work equipment safely.
Tips for More Accurate Circular Saw Cuts
Once you’ve mastered the basic technique, a few simple habits can make your circular saw cuts more accurate and consistent.
Measure Twice, Cut Once
Take the time to check your measurements before making the cut.
Confirm:
- The measurement is correct.
- The cutting line is clearly marked.
- You’ve marked the correct side of the material.
- The waste side is identified.
- The guide is positioned correctly.
Use a Sharp, Suitable Blade
A suitable, good-quality blade can make a noticeable difference to the quality of your cuts.
If the blade is worn, damaged or unsuitable for the material, cutting may become more difficult and the finished edge may be less clean.
Use a Guide for Long Cuts
For long straight cuts, a straightedge or guide rail is one of the simplest ways to improve accuracy.
It gives the saw a consistent reference rather than relying entirely on your ability to follow a pencil line.
Keep the Saw Moving Smoothly
Try to maintain a steady pace throughout the cut.
Avoid sudden changes in direction, excessive pressure or trying to force the saw through the material.
Check Your First Cut
If you’re making several identical pieces, use the first cut as a reference.
Measure it before continuing with the rest. This can prevent a small measuring error from being repeated across multiple pieces.
Practise on Scrap Material
If you’re new to using a circular saw, practising on an offcut can help you become familiar with the saw’s weight, movement and cutting speed before working on your actual project.
You don’t need to make complicated practice cuts. A few straight cuts using a guide can help you build confidence.
Good preparation is usually the key to accurate circular saw cuts. Measure carefully, support the material properly, use a suitable blade and use a guide when accuracy matters.
Frequently Asked Questions
Can I cut straight with a circular saw without a guide?
Yes. Short, straightforward cuts can be made freehand by following a marked cutting line. However, a straightedge or guide is usually easier for beginners, particularly for longer cuts where small changes in direction can become more noticeable.
What is the easiest way to cut a straight line with a circular saw?
The easiest way to cut straight with a circular saw is to measure and mark the cut carefully, secure the material and use a straightedge or guide rail. This gives the saw a consistent reference to follow.
Why does my circular saw keep cutting crooked?
There are several possible reasons. The material may be moving, the saw may be pushed too quickly, the blade may be unsuitable or worn, or you may be trying to follow the line freehand over a long distance.
Should I use a guide rail with a circular saw?
A guide rail isn’t essential for every job, but it can be very useful for accurate straight cuts. It’s particularly helpful when cutting plywood, MDF and other large sheet materials.
How do I cut a large sheet of plywood straight?
Support the sheet properly and use a suitable long straightedge or guide rail. Measure the distance between the guide and the saw blade carefully, secure the guide and move the saw steadily along it.
How deep should I set my circular saw blade?
Set the cutting depth according to the material and the manufacturer’s instructions. The saw needs enough capacity for the material, but you shouldn’t simply assume that maximum depth is required for every cut.
Can I use a piece of timber as a straightedge?
Yes, provided it is straight, stable and securely positioned. Check it carefully before using it as a guide, and make sure it cannot move during the cut.
Is a circular saw suitable for cutting MDF and plywood?
Yes. Circular saws are commonly used for cutting sheet materials such as MDF and plywood. The blade you choose can affect the quality of the finished cut, so use one suitable for the material and the result you want.
How can I make repeated cuts the same length?
Make the first cut carefully, then use a suitable fixed reference or stop to help keep subsequent pieces consistent. Always check your first few pieces before cutting a large batch.
What is the most important tip for getting straight cuts?
Don’t rely on the saw alone to keep you straight. Accurate measuring, proper material support and a suitable guide will usually make a bigger difference than simply trying to steer the saw more carefully.
Final Verdict
Learning how to cut straight with a circular saw is mostly about good preparation rather than trying to steer the saw perfectly by eye.
For beginners, the best approach is to:
- Measure and mark the cut carefully.
- Support the timber or sheet material properly.
- Set the correct cutting depth.
- Use a suitable blade for the material.
- Use a straightedge or guide for longer or more accurate cuts.
- Keep the saw moving steadily and under control.
- Avoid forcing the saw through the material.
- Check your setup before starting each cut.
For short, rough cuts, freehand cutting can be perfectly practical. For longer cuts, sheet materials or projects where accuracy matters, a straightedge or guide makes the job much easier.
If you’re new to circular saws, don’t worry about getting perfect results immediately. Practising on scrap material and developing a consistent setup will help you become more confident and accurate with each project.
Once you’ve got the basics right, a circular saw can make fast, accurate straight cuts for a wide range of DIY projects.
Looking for a New Circular Saw or Upgrading Your Setup?
For our full breakdown of top-rated corded and cordless tools, check out my Circular Saw Buying Guide UK for Beginners