
By Enda McLarnon — Experienced UK DIYer sharing practical fixes from my 1958 red brick home.
Disclosure: As an Amazon Associate, I earn from qualifying purchases made through links on this page. If you buy a tool through my links, it costs you nothing extra, but the small commission helps me keep this site running.
If your home was built in the UK before the 1950s, whether a Victorian terrace, an Edwardian semi, or a 1930s suburban semi-detached, you have likely encountered the nightmare of lath and plaster walls.
You drill a neat 6mm hole intending to pop in a standard rawlplug, only for the drill bit to drop through into a hollow cavity. This sends a spiderweb of cracks across the wall leaving a fist-sized chunk of crumbling plaster behind.
Generic DIY advice from US websites frequently recommends standard drywall anchors, toggle bolts, or plastic wall plugs. On UK lath and plaster, these will either crush the fragile wooden laths or pull straight through under the weight of books, timber shelves, or kitchen cabinetry.
Mounting heavy items to lath and plaster requires understanding the underlying structure, locating solid timber studs, or using specialist mechanical fixings designed to span the cavity safely.
Understanding the Structure: What’s Inside Your Wall?
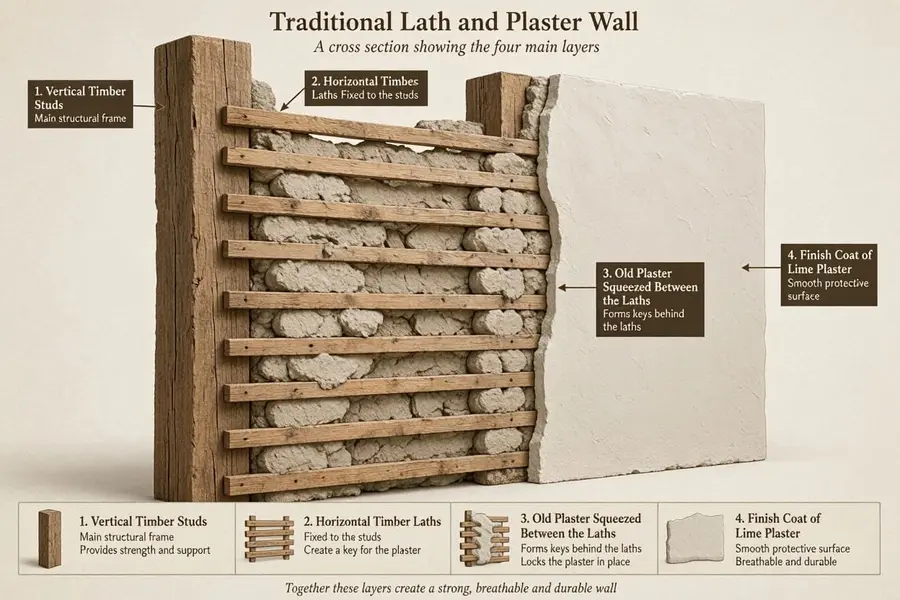
To secure heavy loads without causing structural damage, you need to know how lath and plaster is constructed:
There are 4 parts to this type of wall that was popular in the UK pre-1950
- Studs – Vertical Timber Studs (Main Structural Frame, 400mm/600mm centres)
- Timber Laths – Thin horizontal strips of timber (typically pine or oak) nailed across vertical structural studs. (approx. 25mm wide, 5mm gap)
- Plaster Key – Plaster squeezed between laths (Brittle “Nib/Key”)
- Top Plaster – Finish Coat & Base Lime Plaster (15mm–25mm thick)
The Trap: Over 80 to 100 years, lime plaster becomes brittle. If you use an expanding plug inside the plaster layer, it crushes the key and blows out the finish coat.
Method 1: The Gold Standard (Fixing Directly into Timber Studs)
For heavy loads like book-filled alcove shelves, heavy oak mantels, or TV wall mounts, you must anchor into the underlying vertical timber studs.
How to Locate Studs in Lath and Plaster:
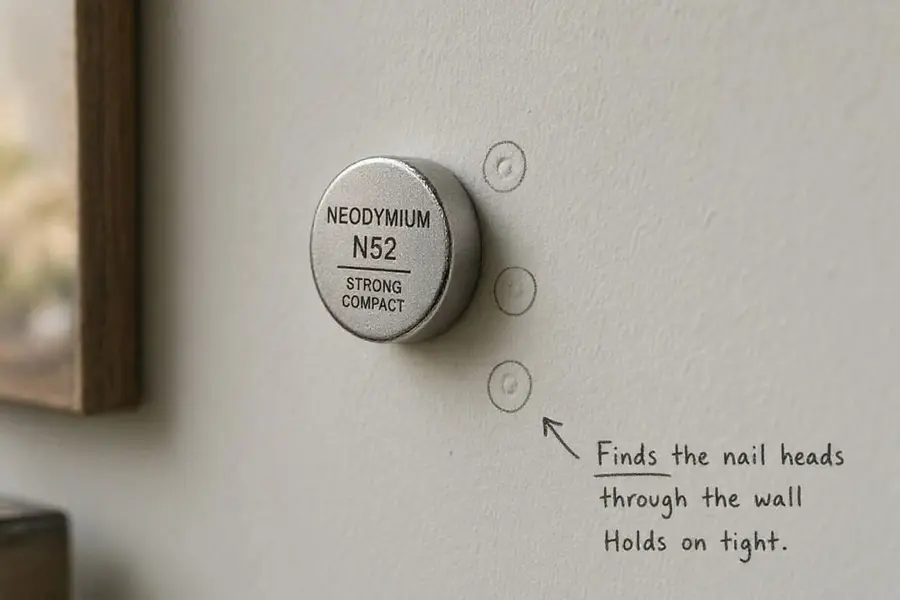
- Forget Standard Capacitive Stud Finders: Cheap stud finders read the varying density of lime plaster and lath as continuous timber, giving constant false positives.
- Use a Rare-Earth Neodymium Magnet: Sweep a strong magnet slowly across the wall. It will snap to the vertical lines of small iron cut nails used to tack the laths to the upright studs. Once you locate three nails vertically in a line, you’ve found the center of your stud.
- The Knocking Test: Tap gently horizontally across the wall. Hollow sounds indicate the lath cavity; a dull, solid thud indicates a vertical stud.
Installation Steps:
- Mark your bracket hole position directly over the stud center.
- Drill a narrow pilot hole (3mm) through the plaster and into the timber stud to confirm wood contact (look for clean wood shavings on the bit).
- Secure the shelf bracket using 5.0mm \times 70mm or 80mm wood screws (such as Spax or Fischer PowerFast) to ensure at least 40mm of thread engagement directly into solid timber.
Method 2: The Cavity Method (When You Can’t Align with a Stud)
If your shelf brackets don’t align with the underlying stud centers, you must span the plaster and lath layer into the hollow cavity using heavy-duty anchors that grip behind the lath without crushing the front plaster face.
The 3 Best Fixings for Lath and Plaster Cavities
| Fixing Type | Shear Load Capacity | Best Used For | Why It Works on Lath & Plaster |
| GripIt Yellow / Red Anchors | Up to70kg – 110 kg per fixing | Medium-to-heavy alcove shelving, mirrors | Flat metal wings open flat inside the cavity, spreading load over multiple laths. |
| Fischer Duopower (Long Variant) | Up to 20kg – 35kg per fixing | Light-to-medium decorative shelves | Extra length (50mm) ensures expansion happens behind the lath, not inside brittle plaster. |
| Heavy-Duty Spring Toggles (M5 / M6) | Up to 45kg per fixing | Kitchen wall units, deep display shelves | Spring-loaded metal wings clamp firmly against the back face of the timber laths. |
Sometimes you may hit solid brick/stone behind the lath and require an SDS hammer drill. If so, check out my article on Why SDS-Plus Drill Bits Snap in Hardened Concrete (And the 4-Cutter Bits Trades Actually Use)
Step-by-Step: Installing GripIt / Spring Toggle Fixings

- Tape the Surface: Apply masking tape over the drilling target. This prevents the top coat of plaster from flaking or spider-webbing.
- Drill the Clearance Hole: Turn off hammer mode on your drill. Use a sharp wood bit or lip-and-spur bit at low speed to cut cleanly through the plaster and wooden lath.
- Check Cavity Depth: Insert a thin screwdriver or probe to confirm there is at least 30mm of clear cavity depth behind the lath for toggle wings to open.
- Insert and Tighten: Insert your spring toggle or GripIt anchor until it sits flush with the wall face. Tighten the machine screw until the internal wings clamp flat against the back of the timber lath. Do not overtighten, as excessive torque can snap old pine laths.
Crucial Pro-Tips for UK Renovators
- Never Use Hammer Action: Keep your combi drill strictly on rotary mode. The hammer impact function will instantly shatter old lime plaster keys behind the wall.
- The Timber Batten Workaround: If hanging exceptionally heavy items (like a full library shelf setup), screw a 21mm times 44mm planed timber batten directly into the vertical studs first. Then mount your shelf brackets anywhere along the batten.
You may also be interested in my wall plugs and bit sizing guide for general DIY.
Recommended Tools & Where to Buy
To complete your lath and plaster shelving project, pick up trade-grade fixings and bits from established UK suppliers:
“When mounting heavy shelving onto blown lath and plaster where there’s no stud present, a 4-pack of [GripIt Yellow 15mm fixings on Amazon] or [GripIt Red 18mm plasterboard anchors] gives you the wing-expansion needed behind the cavity without tearing the plaster.”
“For deep timber studs buried behind 25mm of lath and lime skim, skip standard wall plugs and run [Fischer DuoPower long wall plugs on Amazon UK] paired with heavy-gauge [Spax universal wood screws].”
“Because electronic stud finders get confused by deep lath voids, the most reliable trick is using [ultra-strong N52 neodymium stud finder magnets on eBay] to pull directly onto the tiny iron cut nails securing the laths.”

About the Author: Enda McLarnon
I’m an experienced UK DIYer tackling renovation life inside a 1958 red brick home.
I built this blog to help beginners conquer home maintenance anxiety and save a fortune on expensive trade calls.