By Enda McLarnon — Experienced UK DIYer sharing practical fixes from my 1958 red brick home.
Changing a circular saw blade is one of the most fundamental workshop maintenance tasks you will ever perform. Whether your current blade has gone blunt after cutting treated timber, is gummed up with resin, or you’re swapping from a rough framing blade to a fine finish blade for plywood, knowing how to do it safely takes less than five minutes.
However, because circular saw teeth are razor-sharp and the blade spins at thousands of RPM, rushing the job or skipping safety steps can lead to accidents or a loose arbor bolt that vibrates mid-cut.
This step-by-step guide walks you through changing a circular saw blade safely and correctly in your home workshop or garage.
Table of Contents
Tools & Equipment Needed
Before you begin, gather what you’ll need:
- The correct replacement blade (matching your saw’s diameter and bore size, e.g., 165mm × 20mm — see our Circular Saw Blade Sizes UK guide).
- The hex key (allen key) or spanner supplied with your saw (usually stored onboard the saw body).
- A small block of scrap timber (to lock the blade temporarily if needed).
- Work gloves (optional, but recommended to protect your hands from the teeth).
Step 1: Isolate the Power (Safety First)
Never attempt to change a blade while the saw is connected to power.
- Corded Saws: Unplug the mains lead from the UK wall socket. Do not rely on the trigger switch.
- Cordless Saws: Remove the battery pack completely and store it away from the tool.
This simple habit prevents accidental trigger pulls while your hands are near the arbor bolt.
Step 2: Access the Blade & Arbor Bolt
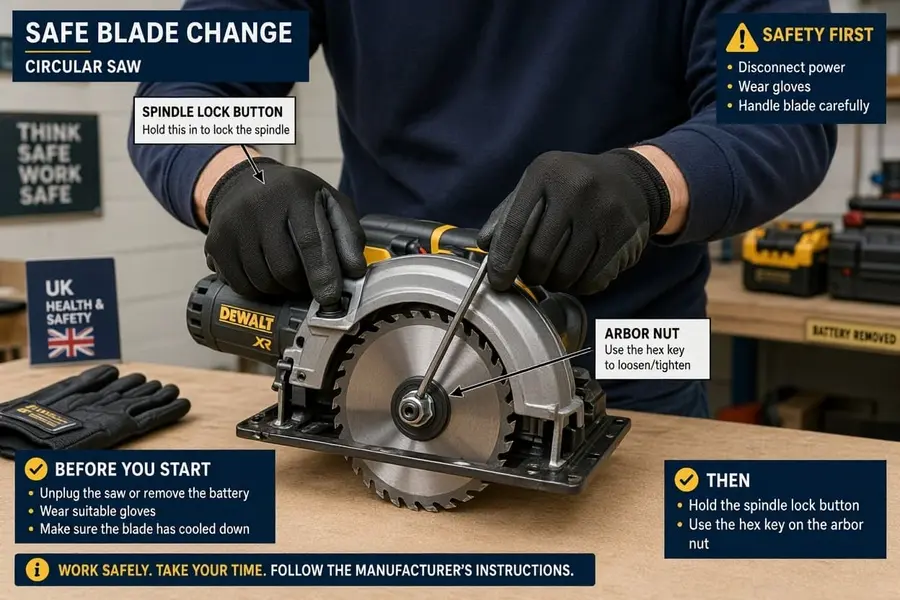
- Rest the saw on a flat surface: Place the saw stable on your workbench or a piece of scrap wood, resting on its motor housing or flat side.
- Retract the lower blade guard: Manually pull back the spring-loaded lower blade guard so you have clear access to the blade and the centre arbor bolt.
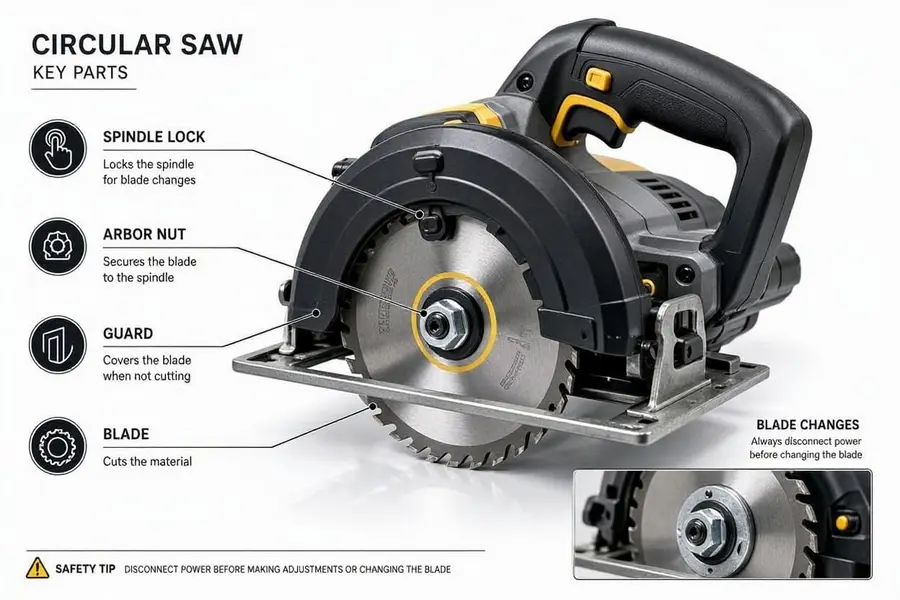
- Locate the spindle lock button: Press and hold the spindle lock button (usually located on the side of the motor housing near the blade). Rotate the blade slowly by hand until the lock pin engages and stops the blade from spinning.
Step 3: Remove the Old Blade
- Check the thread direction: Most circular saws use a standard right-hand thread (anti-clockwise to loosen, clockwise to tighten), but check your manufacturer’s manual if you aren’t sure. Some brands use directional threads that match the blade rotation.
- Loosen the arbor bolt: Insert your hex key into the centre bolt. While holding down the spindle lock button with one hand, turn the key to loosen the bolt.
- Workshop tip: If the bolt is stubborn, place a small block of scrap timber between the saw teeth and the base plate to jam the blade securely while you apply pressure with the wrench.
- Remove hardware: Unscrew the bolt completely, remove the outer flange washer, and carefully tilt the old blade out past the retracted guard.
Step 4: Clean and Inspect the Flanges
Take 30 seconds to inspect the inner and outer clamping flanges (washers) that sandwich the blade:
- Wipe away any accumulated sawdust, resin, or wood chips.
- Check that the mating surfaces are clean and flat. Trapped debris can cause the new blade to wobble or run out of true, resulting in rough cuts.
Step 5: Fit the New Blade (Check Rotation Arrow)
- Check the rotation arrow: Look at the printed arrows on your new blade and compare them to the rotation arrow stamped on the saw’s upper blade guard or housing. The teeth must point forward in the direction the motor spins. If you put the blade on backwards, it won’t cut and will generate dangerous friction and smoke.
- Mount the blade: Slip the new blade over the arbor spindle, ensuring it seats cleanly onto the inner flange ring.
- Replace hardware: Put the outer flange washer back in place and thread the arbor bolt in by hand first to avoid cross-threading.
Step 6: Secure the Arbor Bolt
- Engage the spindle lock: Press and hold the spindle lock button again.
- Tighten firmly: Use your hex key to tighten the arbor bolt securely.
- Workshop rule: Tighten it firmly, but do not over-torque it using extension pipes or excessive force, or you risk stripping the thread or making it impossible to remove next time.
- Check rotation by hand: Release the spindle lock and spin the blade freely by hand to ensure it clears the guard and base plate without rubbing.
Final Check & Test Run
Before making any cuts:
- Ensure the lower blade guard snaps back smoothly and covers the teeth when released.
- Reconnect your battery or plug the cord back in.
- Run the saw briefly in mid-air for two seconds to check for vibration or wobbling.
The Bottom Line
Changing a circular saw blade takes very little time, but getting into the habit of isolating power, verifying the rotation arrow, and checking flange cleanliness keeps your workshop safe and your cuts razor-sharp.
Ready to see how blade choice and maintenance fit into your wider tool setup? Head back to our comprehensive Circular Saw Buying Guide for UK DIYers to explore power options, sizes, and top beginner recommendations.

About the Author: Enda McLarnon
I’m an experienced UK DIYer tackling renovation life inside a 1958 red brick home.
I built this blog to help beginners conquer home maintenance anxiety and save a fortune on expensive trade calls.