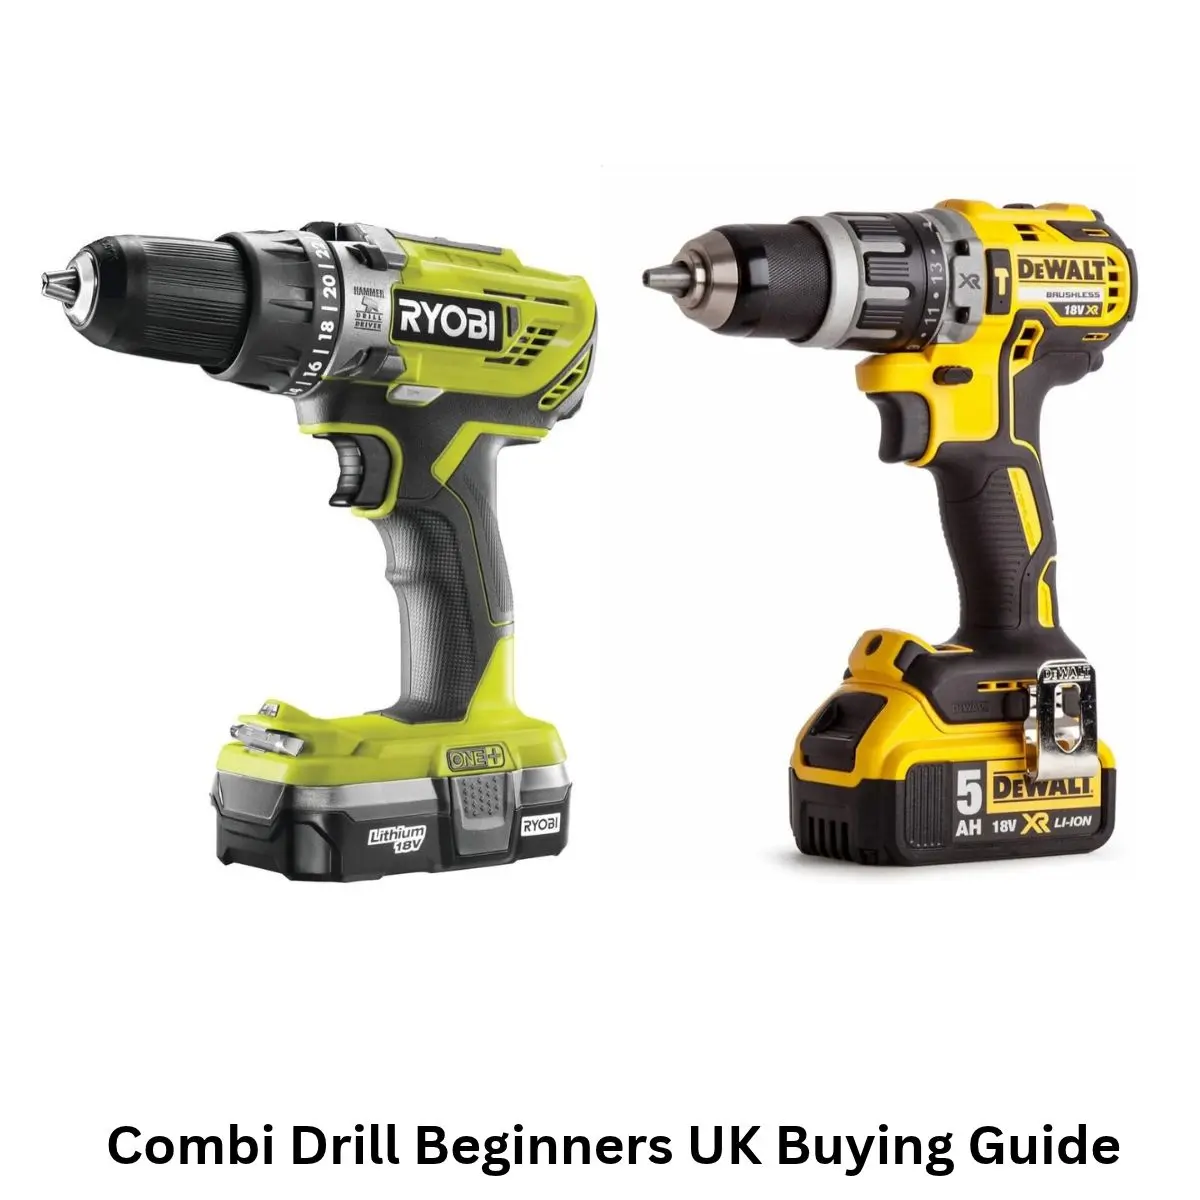
If you are starting out on your UK home improvement journey, there is one power tool that almost every experienced DIY enthusiast will tell you to buy first: the cordless combi drill.
Often called the “Swiss Army Knife” of power tools, a combi drill can handle 90% of the drilling and driving tasks you’ll ever encounter in a standard British home. Jobs like hanging mirrors on solid brick walls to assembling flat-pack furniture or putting up garden fencing can be done with a combi drill.
This guide is your complete, beginner friendly master manual. Whether you’ve just bought your first cordless drill or are trying to figure out what all those numbers, switches, and dials actually do, this guide breaks it all down into plain, simple English.
As you read through my guide, you will see links to my deep dive guides. If you click on a link, it will take you to an article that goes into that specific topic in more detail. I suggest that you read the full guide and then if a particular section interests you, click on the link to find out more about it.
My Experience: My first combi-drill
“When I bought my first house, I tried hanging a TV bracket on a brick wall with a cheap household driver that I owned. What I managed to do was melt two drill bits. That’s when I bought my first proper 18V combi drill, and it just made DIY so much easier.”
I’ve been using DeWalt 18V tools for years because they are great quality with great service and warranties.”

Table of Contents
What Is a Combi Drill? (The Basics Explained)
A combi drill (short for combination drill) is a 3-in-1 cordless tool. Unlike basic drill drivers or dedicated screwdrivers, a combi drill has three distinct functions in a single body:
- Screwdriving Mode: It can rotate at controlled torque settings to turn screws into wood, plastic, or plasterboard without stripping the heads or snapping screw shanks.
- Rotary Drilling Mode: It can spin smooth, sharp drill bits at high speeds to bore holes into wood, metal, plastic, or MDF.
- Hammer Drilling Mode: Delivers a rapid percussive pulsing action (thousands of tiny impacts per minute) behind the rotating bit. This is specifically designed to smash through tough masonry, such as UK brick, concrete, and mortar.
Deep Dive Guide: Not sure if a combi drill is what you actually need? Read my full comparison: [Combi Drill vs Drill Driver vs Impact Driver: What’s the Difference?]
Anatomy of a Combi Drill
Before you pull the trigger, I have always found it helpful, to know what all the parts are called:
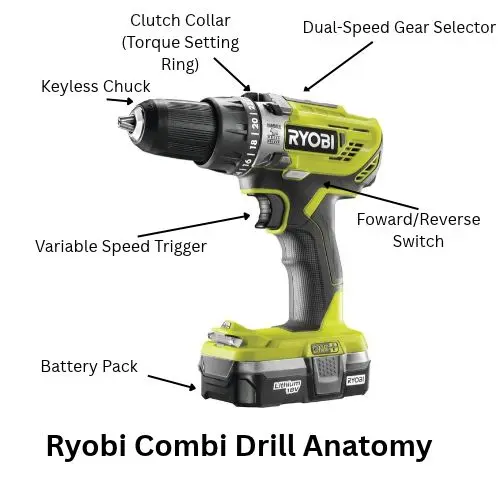
- Keyless Chuck: The front jaw mechanism that holds your drill bits and screwdriver bits securely.
- Clutch Collar (Torque Setting Ring): The numbered ring (usually 1 to 20+) that controls how much force the drill applies before slipping.
- Mode Selector Switch: The dial or sliding collar that switches between Screwdriver, Drill, and Hammer modes. (varies between models)
- Dual-Speed Gear Selector: A switch on top of the drill (marked 1 and 2) for low speed/high torque or high speed/low torque.
- Variable Speed Trigger: Controls how fast the bit turns based on how hard you squeeze.
- Forward/Reverse Switch: Changes rotation direction (and acts as a safety trigger lock in the centre position). Reverse is mainly used for taking out screws.
- Battery Pack: The rechargeable Lithium-ion unit that slides into the base.
Buying Your First Combi Drill: What to Look For
Walking into a tool shop or browsing online can get confusing with all the technical jargon. Here are the three main choices you’ll face when buying your first combi drill:
1. 12V vs 18V: Which Power Level Do You Need?
- 12V Combi Drills: the 12V is compact, lightweight, and easy to handle in tight spaces. It’s ideal for basic furniture assembly, light kitchen fitting, and small home repairs.
- 18V Combi Drills: The standard benchmark for UK home DIY. An 18V drill provides the extra torque and hammer impact needed to reliably drill 6mm and 8mm holes into tough external brickwork and internal masonry walls.
My Deep Dive Guide: [12V vs 18V Combi Drills: Which One Do DIY Beginners Need?]
2. Brushed vs Brushless Motors
- Brushed Motors: These have traditional, budget friendly motors that use small carbon brushes to transfer electricity. They are cheaper upfront but slightly less efficient and can run warmer.
- Brushless Motors: These have the most modern, computer-controlled motors. They offer up to 50% longer run-time per battery charge, deliver more power in a smaller body, and don’t wear out over time.
My Deep Dive Guide: [Brushless vs Brushed Combi Drills: Is Brushless Worth the Extra Money?]
3. Kits vs Bare Units
When buying cordless tools, pay close attention to the actual manufacturer listing:
- Combi Drill Kit: Includes the drill body, 1 or 2 rechargeable batteries, a charger, and often a carry case.
- Bare Unit (Tool Only): Includes only the drill body. These are cheaper, but intended for people who already own compatible batteries from the same brand (e.g., DeWalt, Makita, Ryobi, Bosch).
My Deep Dive Guide: [Kit vs Bare Unit: How to Buy Your First Power Tool System]
Demystifying the Controls & Settings
The secret to using a combi drill properly isn’t brute force. It is simply using the right settings for the job.
Gears
- Gear 1: Low speed/High Torque – best for screwdriving
- Gear 2: High speed/Low Torque – best for drilling holes
Modes
- Mode 1: Screwdriver icon – Uses the torque clutch for driving and removing screws
- Mode 2: Drill bit icon – Bypasses the clutch and uses full power
- Mode 3: Hammer icon – Activates hammer mode for percussive action (drilling masonry)
Understand Settings Simply
There are only three settings which you need to understand and once you understand these using a drill is a great deal easier.
Setting 1: Gears 1 & 2
On most brands of combi drill this is a sliding switch right on top of the drill body. You simply move this back and forward. It will show either a “1” or a “2”. Whichever number you can see is the gear that is selected.
- Gear 1 (Low Speed / High Power): Use this when driving screws or drilling large diameter holes (e.g., with a spade bit for wood). It gives you maximum control and torque.
- Gear 2 (High Speed / Lower Power): Use this when drilling small-to-medium size holes in wood, metal, or masonry.
Setting 2: The 3 Mode Settings
- Screwdriver Mode (Screw Icon): Engages the clutch collar so you don’t strip screws.
- Standard Drill Mode (Drill Bit Icon): Locks out the clutch collar, delivering 100% continuous power. Use this for wood, plastic, and metal.
- Hammer Drill Mode (Hammer Icon): Engages internal mechanical cams that strike the back of the chuck. Use only for brick, concrete, stone, and mortar.
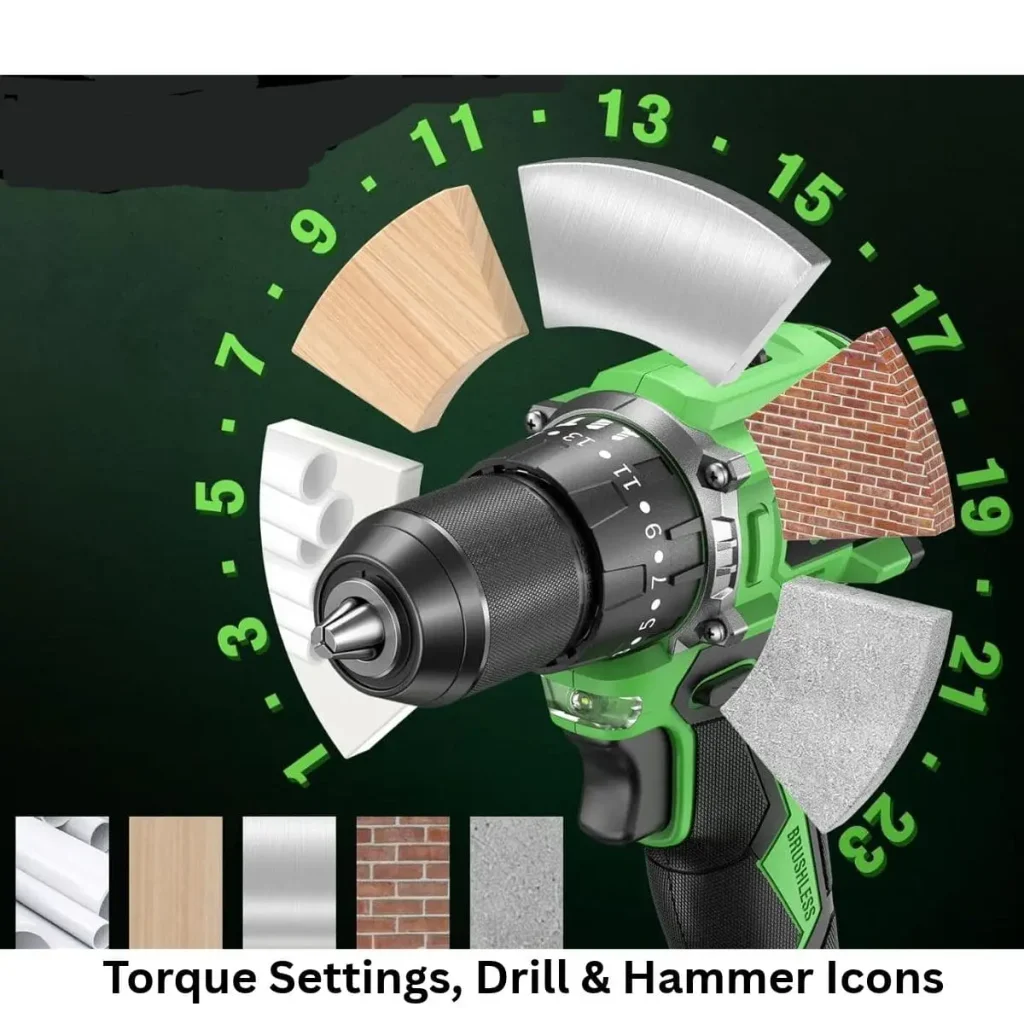
Note: On certain models such as DeWalt there is no mode setting. All the settings are shown on the numbered torque collar. You would have 1-15 for your screwdriver, a drill icon and a hammer icon on one wheel.
Setting 3: The Numbered Torque Collar (1–20+)
The torque ring acts like an automatic brake. When driving a screw, once the screw reaches the set resistance, the clutch disengages and makes a loud clack-clack-clack sound. (Don’t panic, you haven’t broken the drill)
- Low Numbers (1–5): Soft woods, small screws, flat-pack furniture, plasterboard.
- Medium Numbers (6–12): General woodworking, driving screws into softwood studs.
- High Numbers (13–20+): Large wood screws, hardwoods, driving long fixings.
My Deep Dive Guides:
- [Combi Drill Settings Demystified: Torque, Gears, and Modes]
- [How to Use a Keyless Chuck (Inserting & Removing Bits Securely)]
- [When (and How) to Use Hammer Mode on Your Combi Drill]
Essential Drill Bits & Wall Fixings for UK Homes
A combi drill is only as good as the bit inserted into the chuck. Using the wrong bit will ruin your project and damage your tool.
| Bit Type | Visual Identification | Best Used For |
|---|---|---|
| Wood (Brad) | Sharp centre point spike | Timber, Joinery, MDF |
| Masonry | Carbide “arrowhead” tip | Brick, Concrete, Mortar |
| Metal (HSS) | Smooth conical tip | Steel, Copper, Aluminium |
Screwdriver Bits: PZ vs PH (Crucial UK Tip!)
Most UK screws (especially standard wood screws and chipboard screws) use Pozidriv (PZ) heads, identifiable by 4 small radial tick-marks radiating from the cross center.
- Always match a PZ2 bit to a PZ2 screw head.
- Using a standard Phillips (PH2) bit on a Pozidriv screw will cause the bit to slip (cam-out) and strip the screw head instantly!
Matching Drill Bits to Wall Plugs (Rawlplugs)
When hanging shelves, TVs, or curtain rails on UK masonry walls, you will need plastic wall plugs:
- Yellow Plug (5mm): Requires a 5mm masonry bit and 3.0–3.5mm screws.
- Red Plug (6mm): Requires a 6mm masonry bit and 3.5–4.5mm screws (The UK home standard!).
- Brown Plug (7mm): Requires a 7mm masonry bit and 4.5–6.0mm screws (Heavy-duty loads).
My Deep Dive Guides:
- [The Complete Beginner’s Guide to Drill Bits (Wood, Metal & Masonry)]
- [Screwdriver Bits Explained: PZ vs PH vs Torx (Stop Stripping Screws!)]
- [Wall Plugs & Bit Sizing: How to Match Drill Bit, Plug, and Screw]
Step-by-Step DIY Guides for Common Tasks
Now that you know the tool and accessories, here is how I recommend you apply them safely in real-world scenarios:
1. Drilling into UK Brick and Mortar Walls
- Use a cable & pipe detector on the wall area first to ensure it’s safe to drill. That’s really important!
- Insert a masonry drill bit (e.g., 6mm for a red wall plug).
- Get you drill and switch the combi drill selector to Hammer Mode and Gear 2.
- Hold the drill perpendicular (90 degrees) to the wall. Then apply steady, firm forward pressure and squeeze the trigger.
- Once drilled to the correct depth, pull the drill back out while it’s still spinning to clear out brick dust.
2. Drilling Wood Without Splitting It
- Never drive a screw directly into timber near the edge without drilling a pilot hole first.
- Select a wood bit that is slightly narrower than the shank of your screw.
- Set the drill to Standard Drill Mode (Drill icon) and Gear 2.
- Drill through the timber cleanly, then switch to Screwdriver Mode and Gear 1 to drive the screw flush.
My Deep Dive Guides:
- [How to Drill into UK Brick and Mortar Walls Safely]
- [How to Drill Wood Without Splitting It (The Power of Pilot Holes)]
- [How to Drive Screws and Assemble Flat-Pack Furniture with Control]
Beginner Mistakes, Safety & Tool Care
Avoid these common pitfalls to extend the life of your tool and protect your home:
5 Common Beginner Mistakes to Avoid
- Leaving the Drill in Reverse: If your drill is spinning clockwise, it’s driving forward. If it’s struggling to drill or making a screeching noise, check if the directional lever was bumped into reverse!
- Using Hammer Mode on Wood or Plasterboard: Hammer mode will tear up wood fibers and shatter internal plasterboard/drywall. Save hammer action exclusively for brick and masonry.
- Not Tightening the Chuck Properly: Always hold the chuck collar firmly and tighten until you hear a ratchet click to stop bits from slipping inside the jaws.
- Pushing Too Hard on Masonry: Let the hammer mechanism do the work. Pressing down with extreme body weight will overheat and burn out carbide masonry bits.
- Over-Tightening Flat-Pack Furniture Screws: High torque will strip cheap MDF and particle board instantly. Always set your clutch ring low (1–4) when assembling flat-pack items.
“Take it from me, I once stripped half the cam-lock screws on a flat-pack wardrobe because I left my drill in High Gear with the torque maxed out. Don’t make the same mistake I did; turn that clutch ring down!”
Lithium-Ion Battery Storage Warning
In the UK, garage and shed temperatures regularly drop below freezing during late Autumn and winter. Never store Lithium-ion power tool batteries in an unheated shed or garage overnight in cold weather. Cold temperatures can permanently degrade the lithium cells and prevent the battery from holding a charge.
My Deep Dive Guides:
- [7 Common Combi Drill Mistakes Beginners Make (and How to Fix Them)]
- [How to Look After Your Combi Drill Batteries for Long Life]
Final Thoughts: Getting Started
A quality combi drill is the best investment you can make for your home tool collection. Take time to practice drilling test holes into scrap wood or test masonry bricks before tackling major projects, and always wear eye protection when drilling overhead or into stone and brick.
Have questions about choosing your first drill or tackling a specific home project? Explore our detailed related guides linked above!