How to Change an Angle Grinder Disc (Quick & Safe Guide UK)
Changing an angle grinder disc is a simple job once you know the right steps — but it’s also one of the most common things beginners get wrong. Whether you’re switching from a cutting disc to a flap disc, replacing a worn wheel, or fitting a wire brush, the process is straightforward when you follow the correct method.
I’ve been using angle grinders for over 50 years in my garage here in Northern Ireland, and in this guide I’ll show you the safest, easiest way to change a disc on any grinder.
Before you start, I recommend reading my Angle Grinder Safety UK guide — disc changes are simple, but they still require proper handling.
What You’ll Need
- Angle grinder (corded or cordless)
- New disc (cutting disc, grinding disc, flap disc, or wire wheel)
- Pin spanner / wrench (usually supplied with the grinder)
- Safety gloves
- Lock‑nut (already on the grinder)
If you’re unsure which disc type you need, see my Angle Grinder Disc Types Explained.
Safety First
Always unplug the grinder or remove the battery before changing a disc.
Never attempt to change a disc while the grinder is connected to power.
Wear gloves — discs can be sharp, and the spindle can pinch your fingers.
For full safety guidance, see my Angle Grinder Safety UK.
Step‑by‑Step: How to Change an Angle Grinder Disc
Step 1: Disconnect the Power
- Corded grinder: unplug it
- Cordless grinder: remove the battery
This prevents accidental starts.
Step 2: Lock the Spindle
Most grinders have a spindle lock button on top.
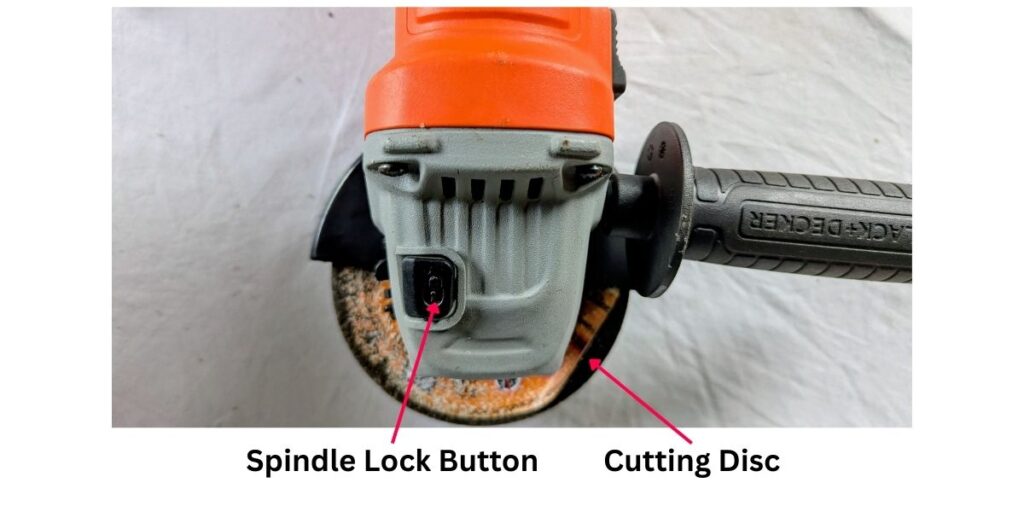
The image above shows my Black & Decker angle grinder, with an arrow pointing to the spindle lock and another arrow pointing to the cutting disc.
- Press and hold the button
- Rotate the disc by hand until it clicks and locks
This stops the spindle from turning while you loosen the nut.
Step 3: Loosen the Lock Nut
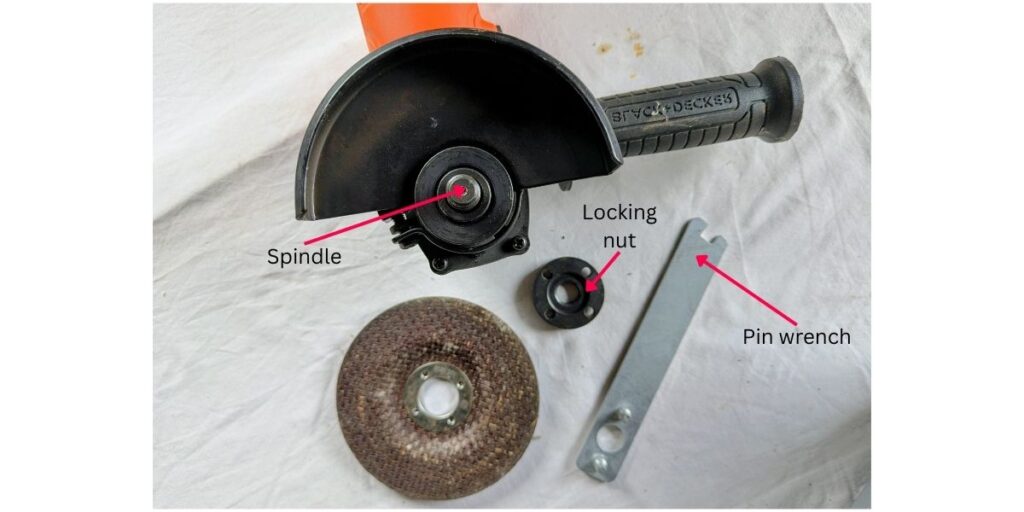
Use the pin spanner (the two‑pronged wrench) that came with your grinder.
- Insert the pins into the holes on the lock nut
- Turn the wrench anti‑clockwise
- The nut will loosen and spin off easily
If your grinder has a tool‑free nut, simply twist it by hand.
Step 4: Remove the Old Disc
Lift the disc straight off the spindle.
If it’s stuck, gently wiggle it — don’t force it or pry it with tools.
Step 5: Fit the New Disc
Place the new disc onto the spindle with the label facing outward (most discs are designed this way).
Make sure it sits flat and centred.
Step 6: Tighten the Lock Nut
Screw the lock nut back on:
- Hand‑tighten first
- Then use the pin spanner to snug it up
Do not overtighten — the grinder’s rotation will naturally tighten it during use.
Enda’s Advice: Try not to over tighten as it makes extremely hard to remove the next time.
Step 7: Reconnect Power and Test
- Plug the grinder back in or reattach the battery
- Hold it away from your body
- Run it for 2–3 seconds to ensure the disc spins true
If it wobbles, stop immediately and refit it.
Common Mistakes to Avoid
- Changing discs with the grinder still plugged in
- Overtightening the lock nut
- Using the wrong disc for the job
- Forgetting to lock the spindle
- Running the grinder without checking for wobble
- Using damaged or cracked discs
Recommended Tools for This Job
These guides will help you choose the right grinder and discs:
- Angle Grinder Buying Guide
- Angle Grinder Brands UK
- Angle Grinder Disc Types Explained
FAQs
Do all angle grinder discs fit all grinders?
Most 115mm discs fit any 115mm grinder, but always check the bore size.
Can I change a disc without the pin spanner?
Yes — many grinders allow hand‑tightening, and some nuts are tool‑free.
Why won’t my lock nut come off?
It may be overtightened. Use penetrating oil and the spanner, or reverse the nut if it’s reversible.
Which way does the disc go on?
Usually label‑side out, but check the arrows on the disc.
My Final Thoughts
Changing an angle grinder disc is quick and easy once you know the right steps. With the grinder disconnected, the spindle locked, and the correct disc fitted, you’ll be ready to cut, grind, or polish safely and confidently. Take your time, follow the steps, and always prioritise safety.